
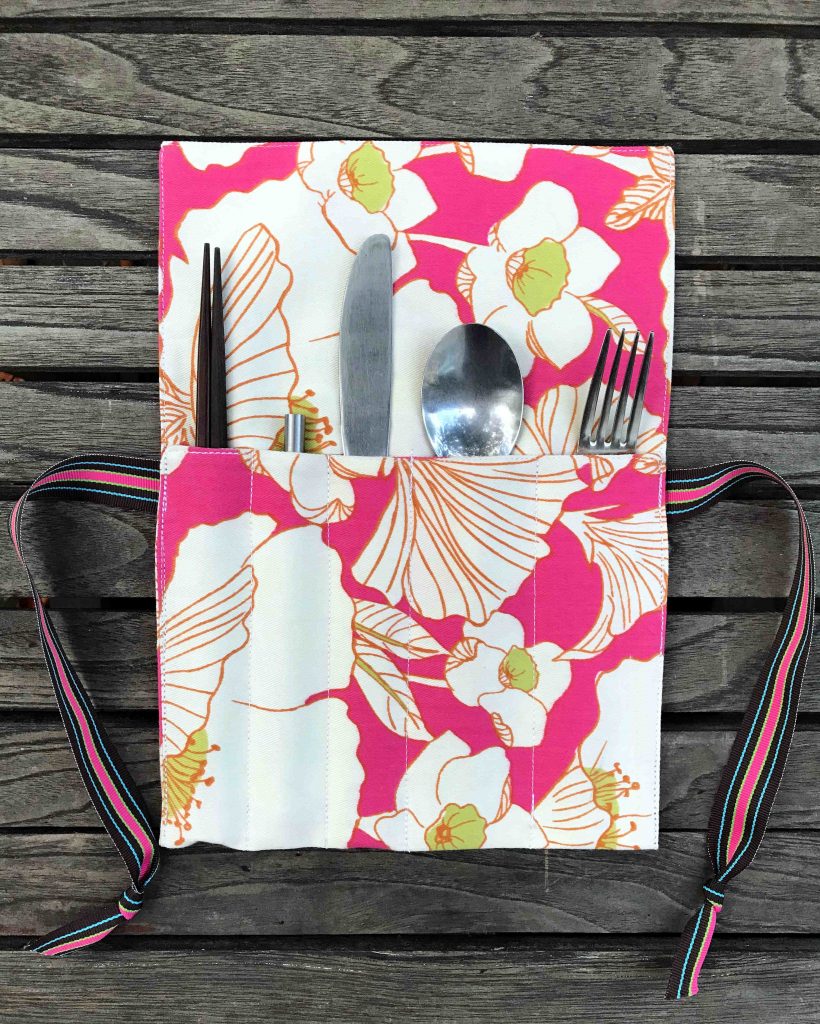
Whether you make or buy a utensil roll (Etsy offers lots), you can easily stash it in your bag, wielding your real spoons everywhere you go, deflecting disposable cutlery left and right like Wonder Woman brandishing her bracelets, but for plastic junk instead of bullets.
I made this utensil roll with some decor and drapery fabric a generous seamstress donated to the Reusa-bags project that I started last year. This pretty, medium-weight fabric made one beautiful shopping bag and with the scraps, a few of these utensil rolls.
If you don’t sew and want to learn, start with something simple like this utensil roll. It also makes a very nice gift for the zero-waster or zero-waste newbie in your life.
How to sew a utensil roll
Like simple cloth produce bags, this little project will help you clear out some of the scraps sitting on your fabric pile. Since this uses two layers of material, you can use something lighter weight than the decor fabric I used and still have a sturdy roll. I really could have used a denim needle on my standard sewing machine for this heavier fabric but I didn’t have one.
Materials
- 17 inch by 17 inch piece of light- to medium-weight fabric, such as a cotton print or a fairly lightweight denim
- 24 to 28 inches of ½- to ¾-inch ribbon
Step 1: Cut the fabric
For this utensil roll, I cut out a piece of fabric approximately 8 ½ inches wide by 34 inches long and folded it in half so I had one fewer side to sew. If you have smaller pieces of fabric, cut out two rectangles, each 8 ½ inches wide by 17 inches long. Two contrasting patterns would look nice.
I had other scraps left over and cut out a several pieces about six inches wide by 17 inches long for narrower utensil rolls. I’ll add fewer slots to those. The size of your utensil roll will ultimately depend on the size of your fabric scraps.

Step 2: Sew the two rectangles together
Sew the right sides (i.e., the patterned sides) facing together, leaving a 4-inch opening on the bottom side of the utensil roll. I should have first finished the bottom edges of the raw fabric on my serger (or with a zigzag on a standard machine). Oops! Not a big deal.
In the pic below, I haven’t sewn the top edge because I used a very long piece of fabric and folded it. No need for a seam there. If you have cut two rectangles, sew that top edge as well.
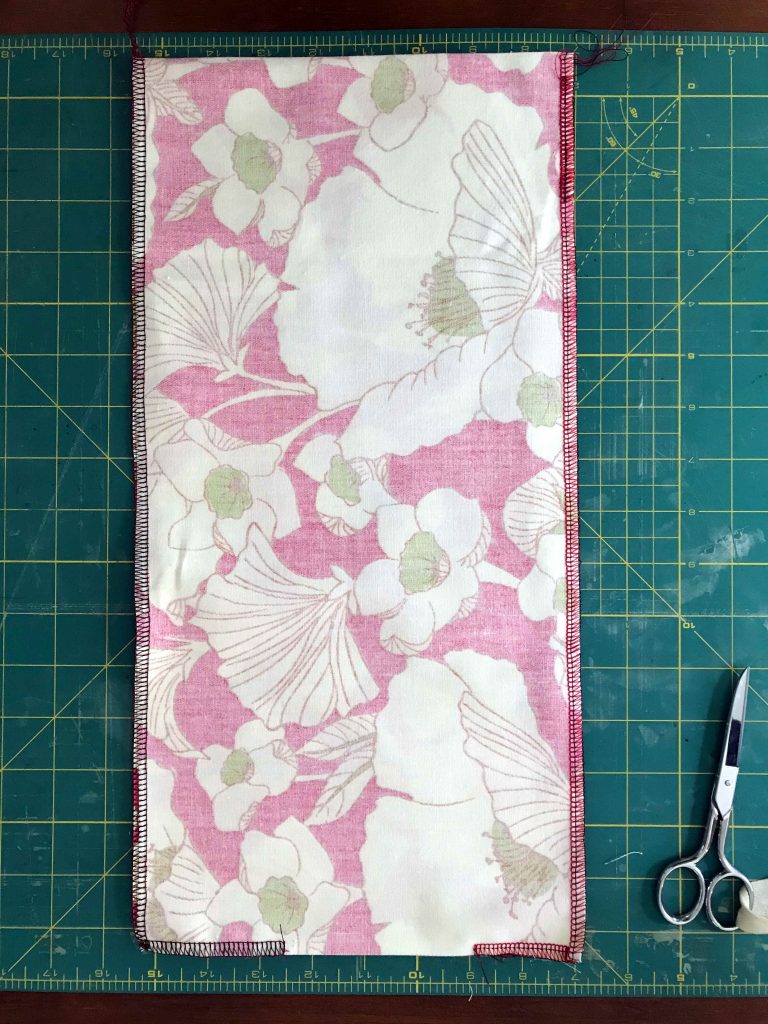
Step 3: Turn the rectangle inside out through the opening at the bottom
After turning this inside out, press everything well. Fold down the fabric of the opening toward the inside and press that also.


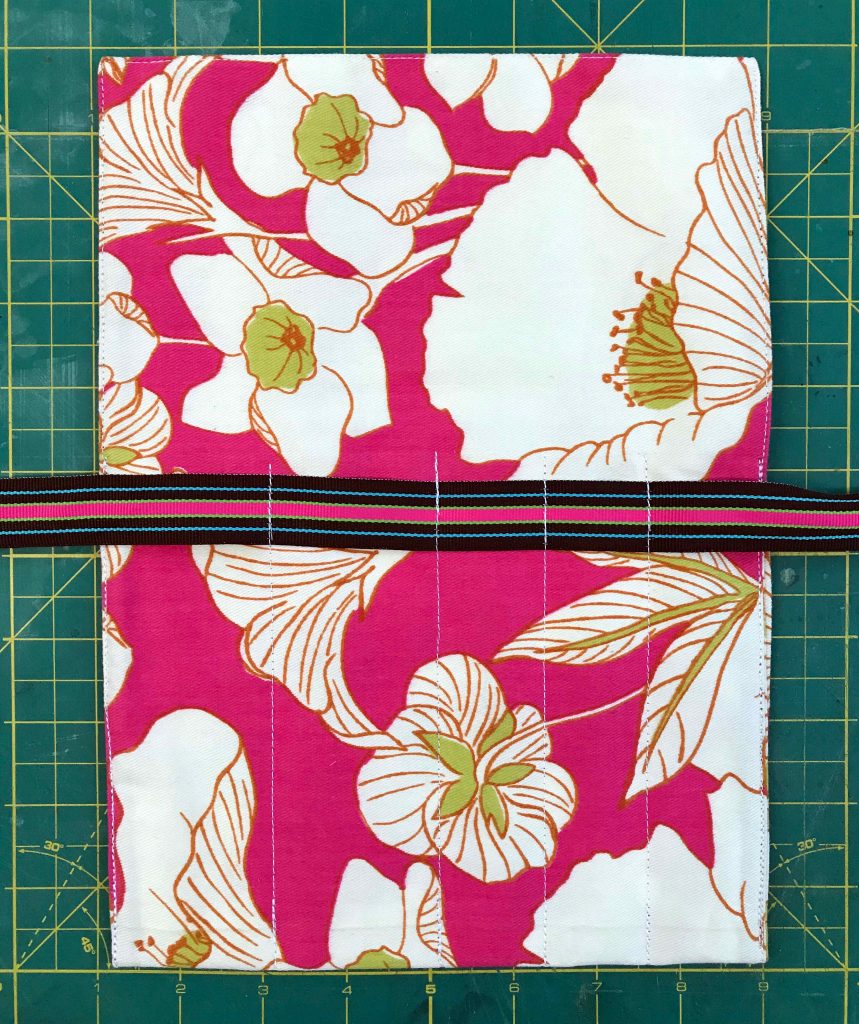
Step 4: Fold the bottom up six inches and topstitch all around the edges
If your fabric is heavy like mine was—and especially if it is heavier—I would topstitch around the entire rectangle before folding it. After you do that, fold the bottom up the six inches and sew the sides so you now have a pouch.


Step 5: Prepare and pin the ribbon to the utensil roll
Either tie the ends of the ribbon in a knot or hem them. Pin the middle of the ribbon to middle of the back of the rectangle. Pin it again at the sides of the roll.

Step 6: Sew the slots
To make this easier, get a ruler out and draw lines where you’ll sew through the pouch, using either tailor’s chalk or a tracing paper and a wheel. For the utensil roll in this post, I made three small slots, each 1 ¼ inches wide and two larger slots, both nearly two inches wide.

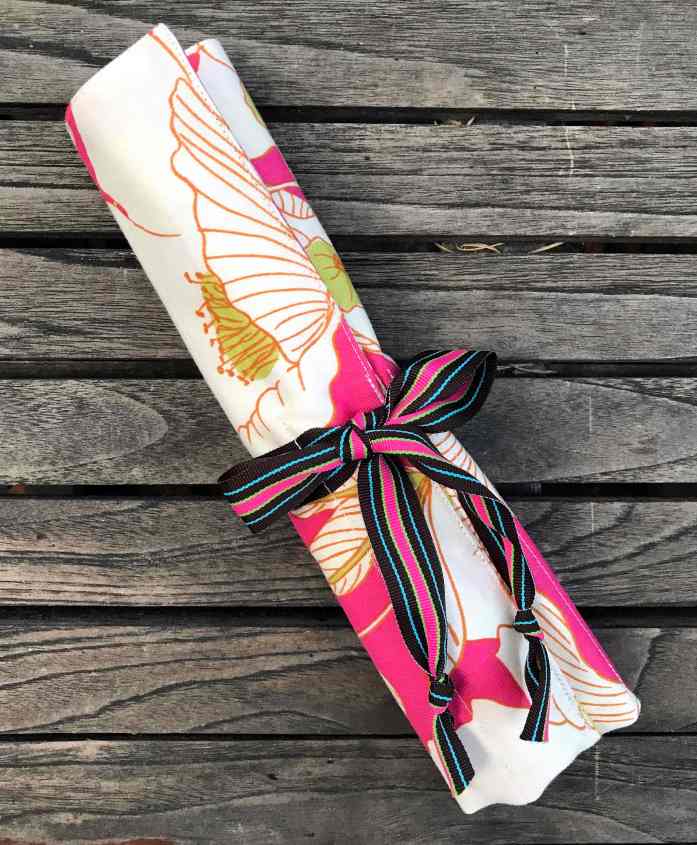
Step 7: Fill with cutlery, chopsticks or a reusable straw or all of the above
Your utensil roll is ready for action! Fill it with your cutlery, roll it up, tie it up and pack it in your bag or zero-waste kit.


Perfect timing! I was planning to make one of these just last week. Thank you for saving me to search for instructions. Xo, Ruth
Great! Happy sewing Ruth.
~ Anne Marie
Another fantastic, brand spanking new idea for me. Thanks for sharing! Now to setup my sewing machine after two years being packed away. I might look for lighter weight utensils as my purse is already heavy with stuff for our little ones.
Thank you Andrea. Glad you like the idea. I think the weight is why bamboo utensils are popular. They are so light. Happy sewing!
~ Anne Marie
What a fabulous share! Planning to make these as gifts too.
Thanks Sandhya,
I hope to sew a pile as gifts too. I know I’d love it if someone made me one. Happy sewing!
~ Anne Marie
Thanks fabolous. I will made one or maybe a lot for friends. 🙂
Great! They are quick to make so if you decide to make a bunch it shouldn’t take too long 😉
I love your blog is my No1. Thanks. Is in my list ( I write in spanish). Thanks 🙂 https://coherenciadineroytiempo.wordpress.com/2019/07/06/mis-eco-zero-waste-blogs-favoritos-espanol-ingles-portugues/
I just finished a couple — so cute! — and a few comments: 1. You don’t mention a seam allowance. I’m guessing it was a quarter inch. I used 3/8″ and it turned out smaller and still fine. 2. I added 2 inches for another pocket, for a napkin ( a 15 1/2 ” square and hemmed with a rolled hem.) 3. With that extra width I had to leave the ribbon unstitched for 2 of the outer slots.
Thank you for this and all the other wonderful things you post! Bento bags are next. Oh, and that reminds me, I wanted to tell you I made fabric coffee filters for my pour over after extreme frustration with the flimsiness of paper filters. And, of course, they’re endlessly reusable. Thanks again for your inspiration!
I know it’s sort of heresy around here, but I might just put some plastic cutlery in mine!
See,
1. We have a whole load of plastic cutlery that we have had for years and pretty much never use; it just sits at the inaccessible top of a cupboard. I refuse to throw it all out, as that’s just wasteful and polluting, but I also never use it as I’ve got my metal cutlery /right there/ in the drawer below.
2. I also have a husband who is very averse to carrying things around! I made up a travel pack of cutlery and mugs for the car boot, but there’s no way he’d agree to carrying it with us on foot…
So I’m thinking, since I don’t mind washing it, and it would greatly increase the chances of us actually taking it with us out and about, why don’t I pop a set of plastic cutlery in my roll? “Use it up, wear it out, make it do or do without”, right? (I absolutely LOVE that catchphrase) It would beat buying new bamboo stuff, and means I’d use – at least a bit of – something that’s just a guilt-inducing space-waster.
On the other hand, the occasions when we’ve bought takeaway food which required utensils in the last 5 years is probably, oh, once? So the cutlery roll might not get a lot of use 😉
On the OTHER other hand, this looks like a lot of fun to make! 😀
Did it! It looks great, and it’s in my handbag as I type 🙂
[…] Esta matéria foi traduzida e republicada. Clique aqui para acessar o site original. […]
I’m new to sewing and trying this out for Christmas presents. What kind of zig zag stitch did you use around the fabric? Could I use a straight stitch around the border and for the top stitch? Any other hints for this newbie? Thanks!
I like how you caught the ribbon tie when stitching the cutlery spaces. I wondered why you did it that way then realized the roll is easier to tie without excess fabric in the way. Brilliant.
I will make two for me and hubby, and a little bit taller to allow for turning down over the tips with snaps to keep them secure. Snaps are in abundance in my notions, so why not.
Hubby dislikes sit-down restaurants and I like don’t like fast-food. So, we compromise if we bring our own or pick it up on the way.
Definitely will be making these for gifts including nice flatware from the thrift store unless I know they already have abundance of mismatched they could use to fill.
Thank you.