
If baking sourdough bread seems intimidating, start with this sourdough-potato focaccia. It calls for humble ingredients and basic tools you likely have on hand.
Focaccia requires no complicated shaping and no scoring, so you won’t feel pressured to render the Mona Lisa’s likeness in the crust. It tastes divine—it does combine sourdough with potatoes in one glorious carbfest, after all—and has a wonderfully crunchy bottom and silky interior.
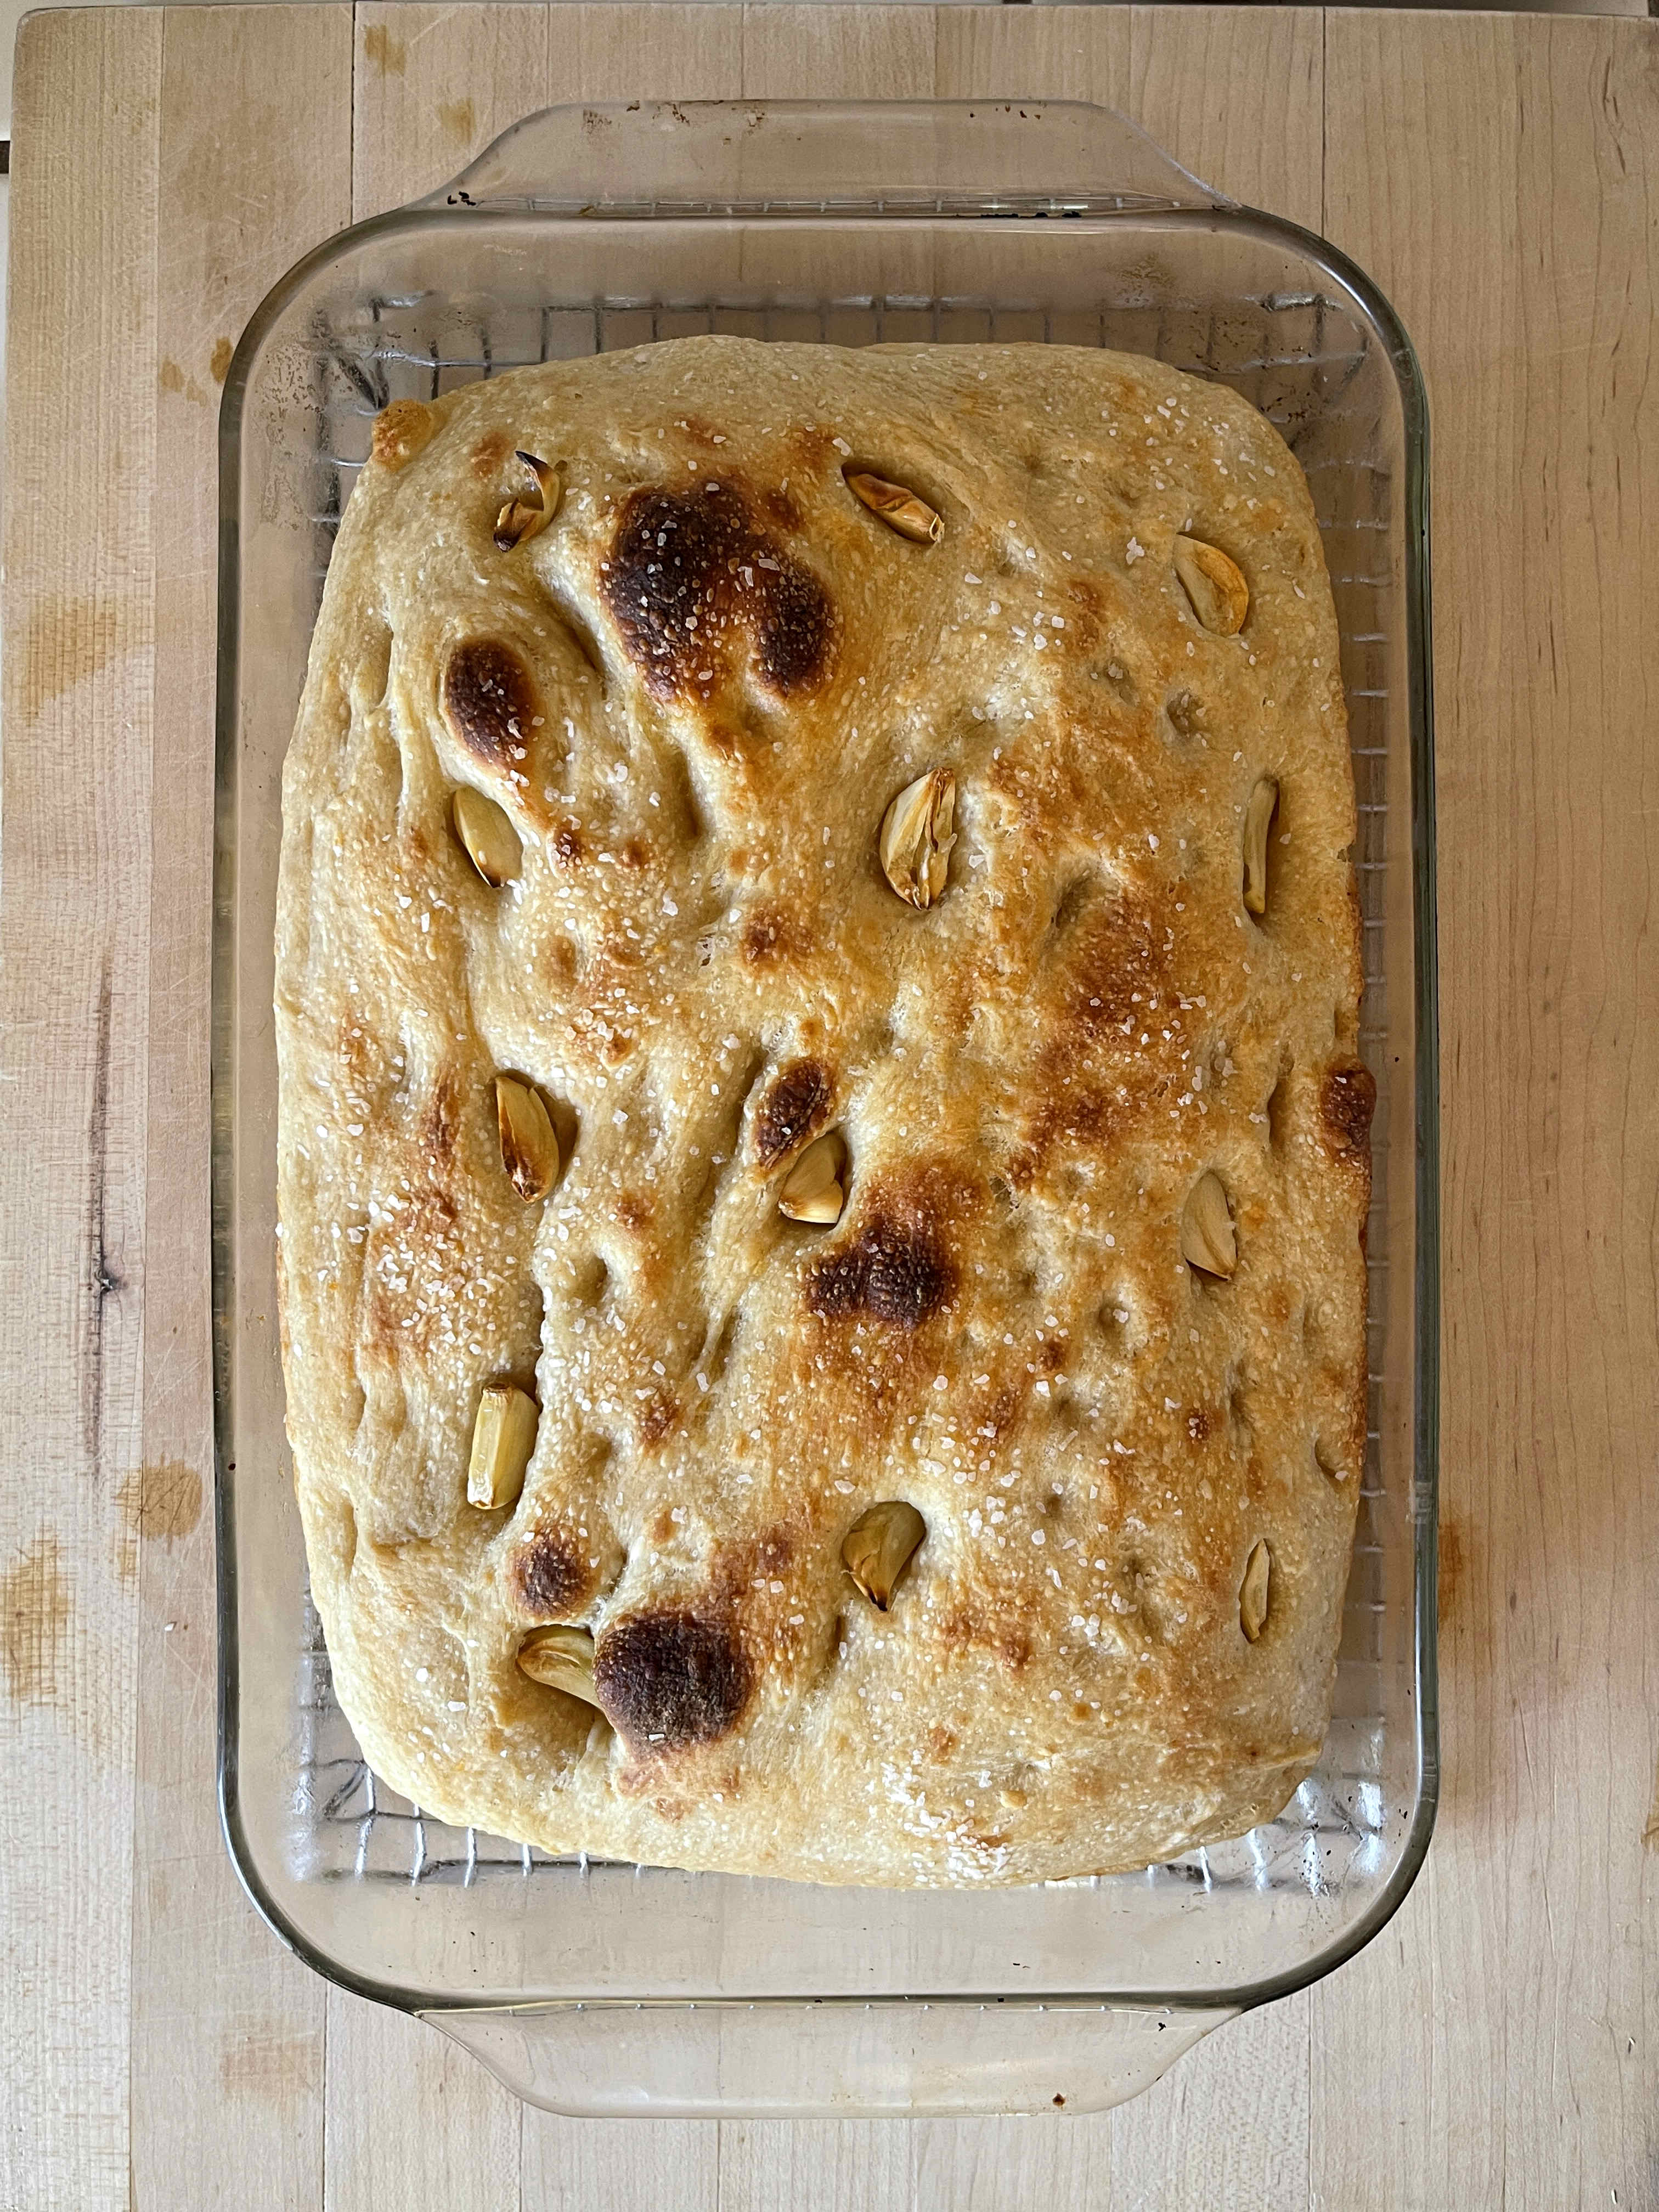
Before baking, sprinkle your sourdough-potato focaccia dough with salt only or top it with little odds and ends you have on hand to add flavor and color to the bread and to avoid wasting fresh produce: those last few whole garlic cloves, the leaves of a couple of sprigs of rosemary, a handful of olives or cherry tomatoes or both, for example.
Sourdough-potato focaccia tools
As for equipment, I use a scale for baking because scales measure ingredients accurately and I never lose track of how many cups of flour I’ve added to the bowl, as often happens when I measure by volume—especially when making a large batch. (This recipe makes a small, manageable amount of dough however—the equivalent of one generous loaf of sourdough bread.) If you don’t own a scale, use the measurements for volume that I’ve included in the recipe down below.
While I do pass cooked potato chunks through a food mill to render very smooth potato mash—and yet called this a “No Special Tools Needed Recipe,” honestly, a masher or fork will do the trick. So don’t feel the need to rush out and buy a bunch of tools to make this. Even with sourdough boules, you can make fabulous loaves with the most basic of equipment.
Use a metal tin or glass baking dish to bake this—no Dutch oven necessary. I proof this in the same pan in which I bake it, hence no need for proofing baskets either.
The sourdough starter: Keep it active
When baking with a sourdough starter, you want to use it at its peak—while the starter still has a dome on top (i.e., it’s still rising) or shortly after it has just begun to fall back down. In my kitchen, that magic moment takes place around six hours after feeding my starter/making my leaven. Confused? Go here for sourdough starter FAQs.

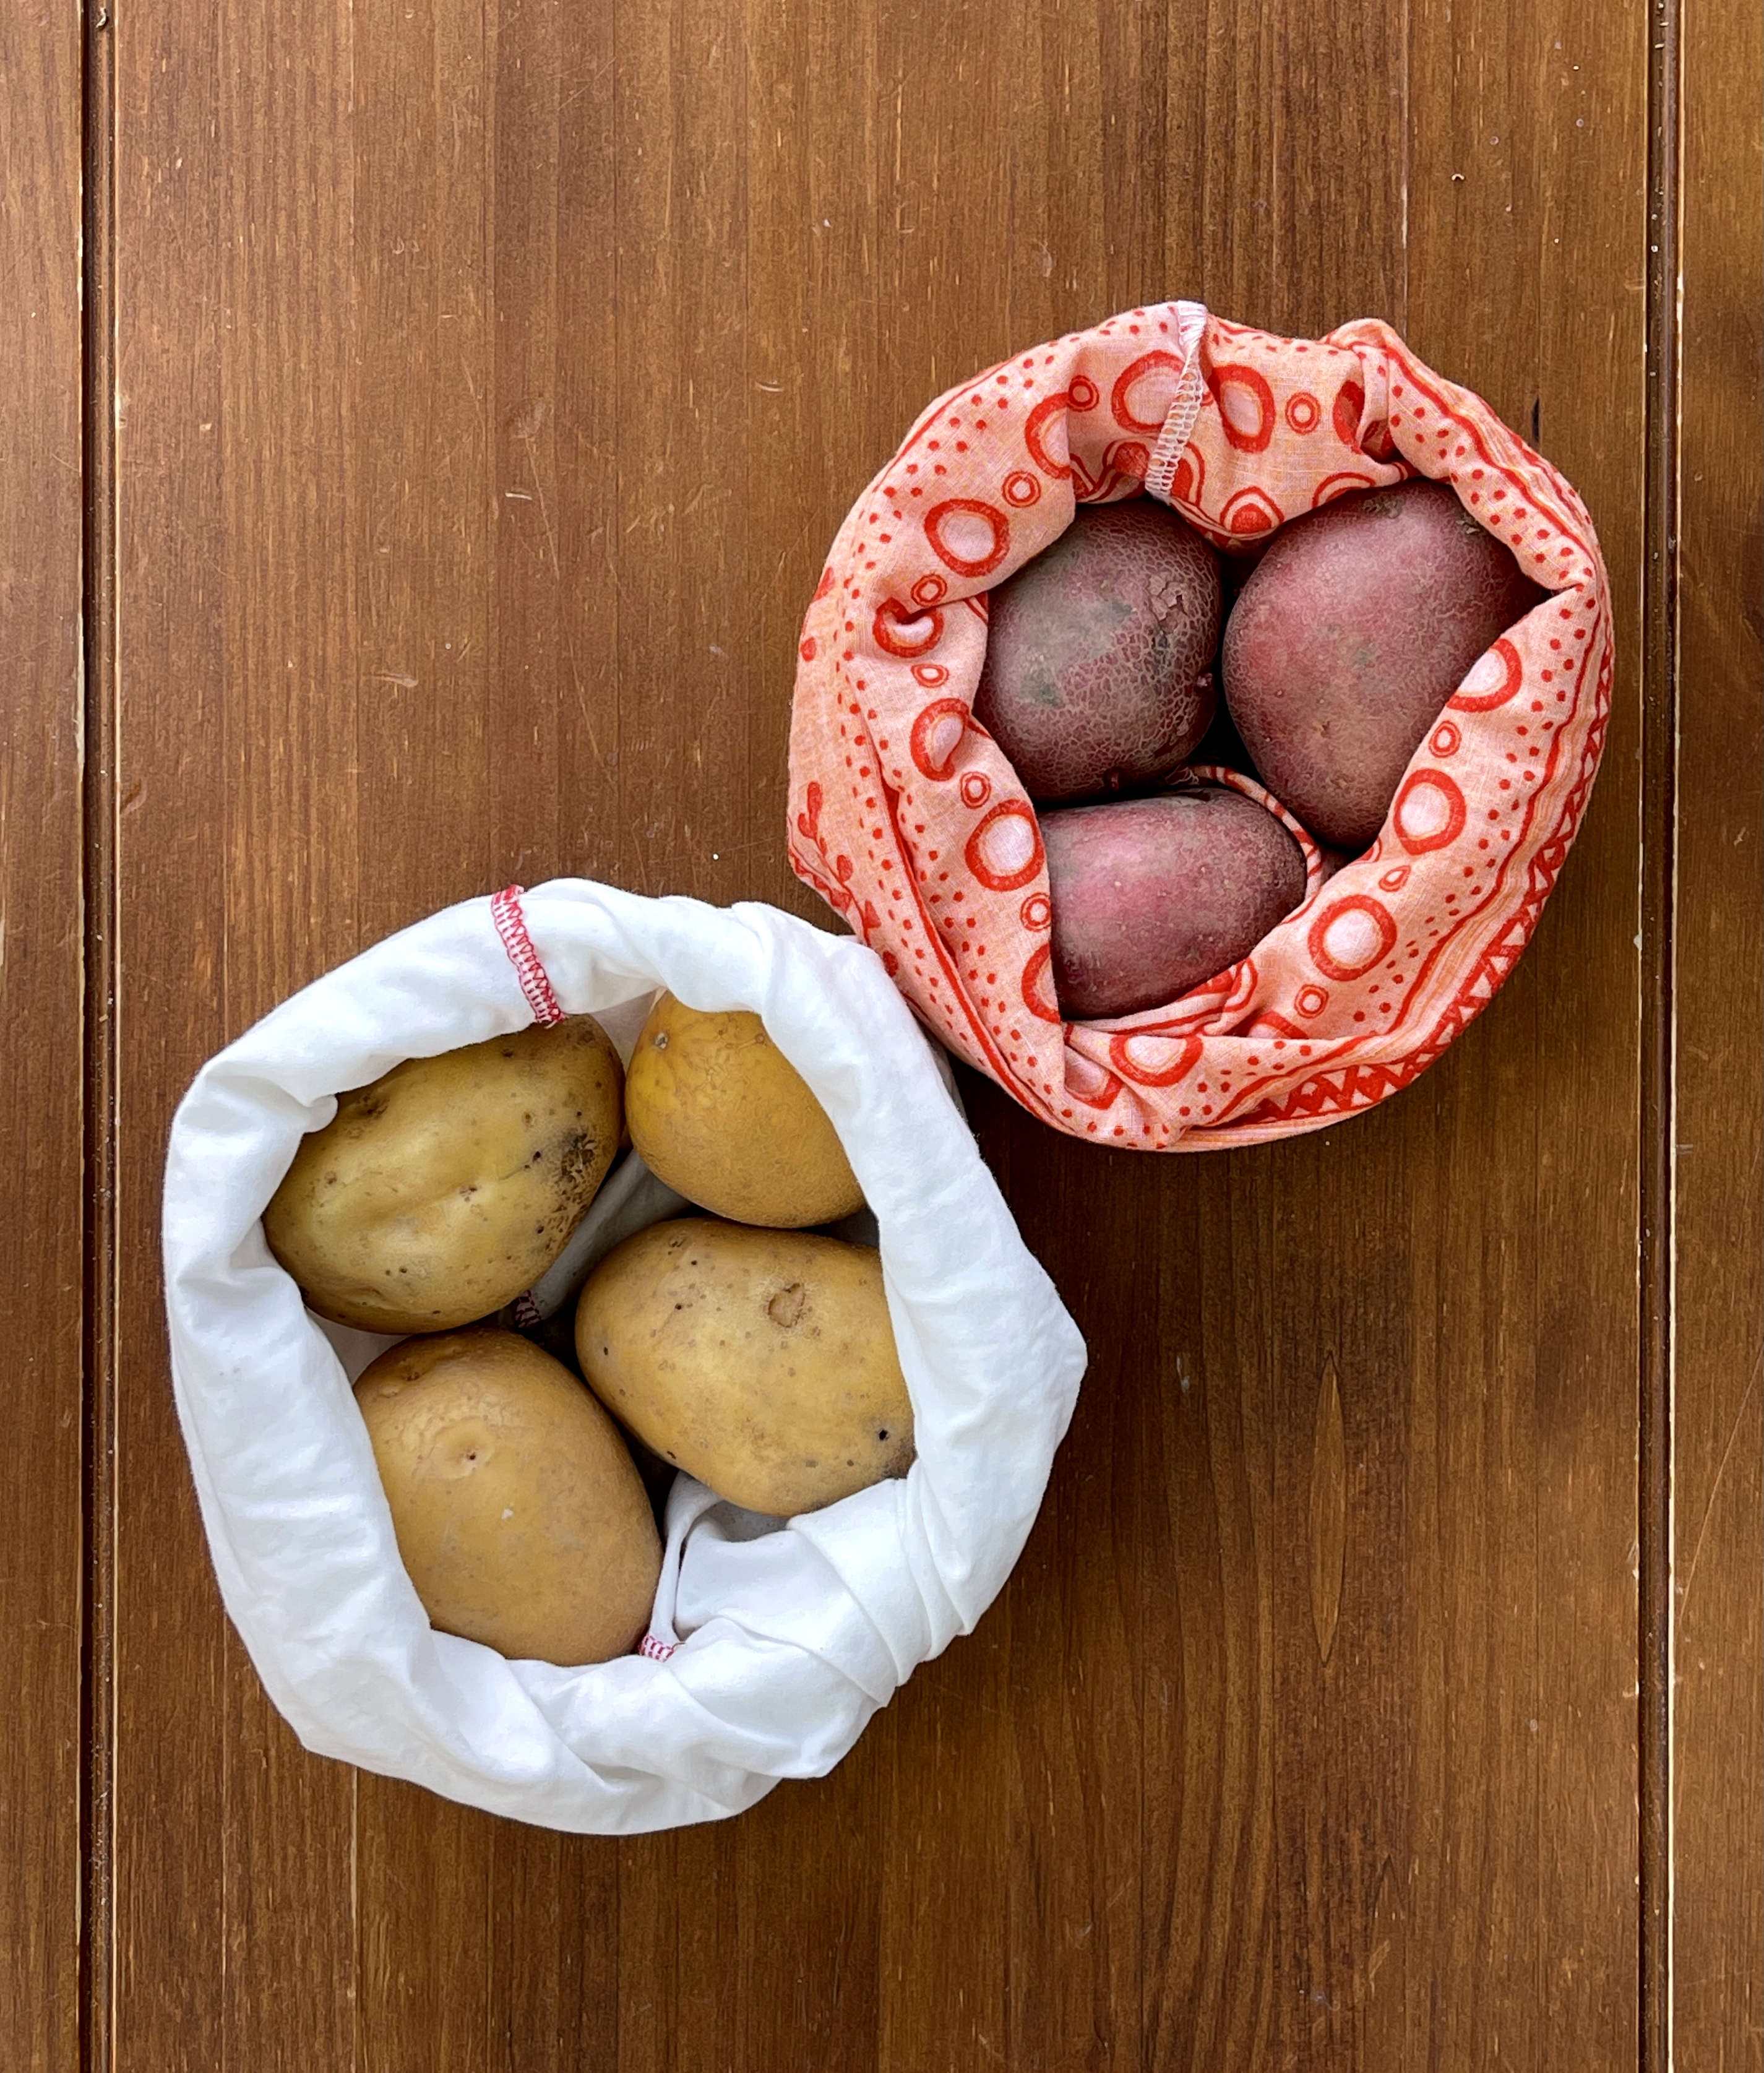
Potato types
I’ve baked this sourdough-potato focaccia with both red or yellow new potatoes. Either type works. Although I peel the potatoes before I cook them, the peels need not go to the compost heap. I fry them up quickly for a tasty, fatty, salty, potato-y snack that I eat straight from the pan while working away on other focaccia prep.
If you use leftover mashed potatoes, add a bit less water to the dough to compensate for the additional liquid in the mashed potatoes. You might need to omit as little as a tablespoon or two of water.


Use potato cooking water, if desired
In addition to saving the potato peels, I also save the potato water to add to the dough by first straining the boiled spuds over a bowl. Do not add this water to the dough until it cools to about 85ºF. While focaccia does have a flat shape compared to a boule of bread, hot water can kill your starter and render a dense slab much flatter than you were going for. If you cook your potatoes a day or two in advance, store the strained potato water and the potatoes in the refrigerator until you make your dough.
When I make sourdough bread, I combine the flour and water the night before I start my dough. Because I use the potato cooking water for this sourdough-potato focaccia, I wait until morning to do this. If you combine the flour and potato water the night before you start the dough, the flour, spurred by the starchy potato water, will likely start to ferment while you sleep, well before you want it to, in which case, you’ll end up with an overly fermented dough-like puddle that won’t rise.
(Go here for more ideas to use cooking water and broths.)
The sourdough-potato focaccia baking schedule
Following the schedule I’ve provided in the recipe, you’ll start this dough on the morning of Day One and bake it on the morning of Day Two. But adjust these mere suggestions to fit your schedule. And remember, the warmer your kitchen, the faster your dough will ferment and proof. So adjust the schedule as necessary—and take notes!


Sourdough-Potato Focaccia
Ingredients
For the leaven
- 3 tablespoons all-purpose flour
- 3 tablespoons whole wheat flour
- 3 generous tablespoons warm water
- 1 tablespoon active starter
For the dough
- ¾ cup mashed cooked yellow or red potatoes about two medium potatoes
- 1½ cups warm tap water or potato cooking water about 85°F
- 4¼ cups all-purpose flour
- 2¼ teaspoon coarse salt
- 1 tablespoon honey omit if vegan
- 3 tablespoons olive oil, divided
- butter, to grease the pan see Note
Optional toppings to choose from
- 12 kalamata olives
- 12 small garlic cloves, peeled
- cherry tomatoes
- half a shallot, sliced thinly
- Bell pepper strips
- fresh herbs
Instructions
Day One, 9 am: Make the leaven and cook the potatoes
- Between 6 and 12 hours before you make the focaccia dough, combine the flours, water, and active starter in a jar or nonreactive bowl, mix well, cover with a lid or plate, and set aside at room temperature.
- Cut the potatoes into 1- to 2-inch cubes. Place in a small pot, cover will water, bring to a boil and reduce to a vigorous simmer until a fork easily slides into the potatoes, about 10 minutes. Strain and reserve the cooking water to add to the dough, if desired. Run the cooked potatoes through a food mill or mash with a fork until smooth.
Day One, 4 pm: Make the dough
- In a medium, nonreactive bowl, combine the warm water and mashed potatoes. Mix well with a whisk or fork until combined well.
- Add flour, salt, honey, 1 tablespoon of olive oil, and the leaven. Stir with a fork, dough whisk or your clean hand until you have a consistent dough. It will be very wet and very shaggy. Cover the bowl with a thin cloth or plate. Note the time. This is the beginning of the bulk fermentation, which will last approximately 3½ to 4 hours, depending on the temperature in your kitchen.
- After 30 minutes, do the first set of stretches and folds of the dough. With a wet hand, reach underneath the bottom of the dough, pull the dough up, and fold it over onto itself. Turn the bowl a quarter turn and repeat the stretching and folding. Repeat two more times, for a total of four turns.
- Repeat this four-turn stretching and folding about once an hour during the bulk fermentation. By the end of the bulk fermentation, the dough will be smooth, glossy, elastic, and filled with air.
Day One, 8 pm
- Near the end of the bulk fermentation, generously grease a 9 by 13-inch metal cake pan or glass baking dish with butter. Pour in 1 tablespoon of the olive oil and spread it evenly around the bottom.
- At the end of the bulk fermentation, turn the dough out onto a clean surface. Wet your hands and pull gently on the top and sides of the dough to form an 8-inch square. Fold the square like a letter, in three sections, folding the left side onto the middle and then the right side over that. You now have a rectangle. Fold the bottom of the rectangle onto the middle and then the top over that. Avoid squeezing out the air bubbles as you work. Place the dough in the pan, seam side up. Turn the dough seam-side down to both conceal the seam and coat the dough in oil. Gently stretch the dough toward the corners of the pan. It won’t fill the pan at this point. Cover with a towel or an inverted baking pan and refrigerate overnight, or for at least 8 hours and up to 16 hours.
Day Two, 8 am
- Remove the pan from the refrigerator. Gently stretch the dough toward the corners of the pan to form a rectangle. The dough will still not fill the pan. Cover the pan and let it sit at room temperature until the dough has puffed up, 2 to 2½ hours. At that point, it should nearly fill the pan. It will not quite double in size.
- Twenty minutes before the end of proofing, preheat the oven to 425°F. Just before baking, drizzle the remaining 1 tablespoon olive oil over the dough and slather it across the top with your hand. Gently press your fingers into the dough to dimple it, carefully stretching the dough toward the edges of the pan to fill it evenly. Try not to deflate the dough. If desired, place toppings such as kalamata olives, garlic cloves and very small cherry tomatoes into the dimples, or lay slices of shallots, bell pepper strips or fresh herbs across the top. Sprinkle with coarse salt.
Day Two, 10:30 am
- Bake at 425°F for 25 to 35 minutes, or until the focaccia is golden brown. Cool on a rack for 10 minutes, then remove from the pan. Cool another 10 minutes before slicing.
Notes
Don’t have a starter but want to bake sourdough-potato focaccia?
Free online sourdough starter workshop! Thursday, October 21st, 4 pm PDT
All you need to make your own sourdough starter are flour, water and a bit of patience. In this class, I will show you how to start a starter culture and how to keep it alive. Bring your flour, water, jar and questions and I’ll answer as many as I can after we start our starters together.
