Updated 04/26/20
See my book for an updated version of this recipe.
Every time I post a picture of a freshly baked sourdough loaf on social media, someone asks “Is the recipe on your blog?” Before I bake this weekend (that’s how I party) and post pics, I thought I better post the recipe here.

On Twitter, I follow Joe Fitzmaurice, an Irish baker, who recently used a hashtag that sums up what I have written here: #EasyWhenYouKnowHow. I constantly refer to my blog for my own recipes. I forget them all. This one I have memorized, however. I could make it in my sleep. Sometimes at 5am, I do make it in my sleep. Although I list 27 steps down below, you can lump them together into a mere seven:
- Make a leaven
- Soak the flours
- Combine half the leaven with the soaked flours
- Turn dough during the bulk fermentation
- Shape dough
- Proof
- Bake
Sourdough Starter
Before you make your sourdough bread, you’ll need a starter. I have written posts on that here, here and here. For answers to the most frequently asked sourdough starter questions, go here.
Recommended Equipment and Books
I hate to tell people to buy more stuff. You may find some of these items at yard sales or secondhand stores. I saw piles of Dutch ovens at a huge antiques fair recently. You don’t need all (or really any) of this BUT I find using the proper equipment results in better loaves. I’ve included some basic items here for those of you with no baking experience.
- Kitchen scale. I highly recommend you get your hands on a scale if you plan to undertake serious baking. I measure my flour in grams because weight can differ greatly from volume. If you don’t have a scale, you’ll find the approximate measurements in cups here.
- Dutch oven. It’s probably wrong to love an inanimate object as much as I love my Dutch oven. Commercial ovens inject the interior with steam, which creates sourdough’s nice crust. You can replicate this environment with a Dutch oven. The moisture from your dough will generate steam inside the sealed Dutch oven. If you don’t have a Dutch oven, bake in loaf pans or on a baking stone or cookie sheet. Mine is huge—6 1/2 quarts. A smaller one will work—5 quarts or even 4.
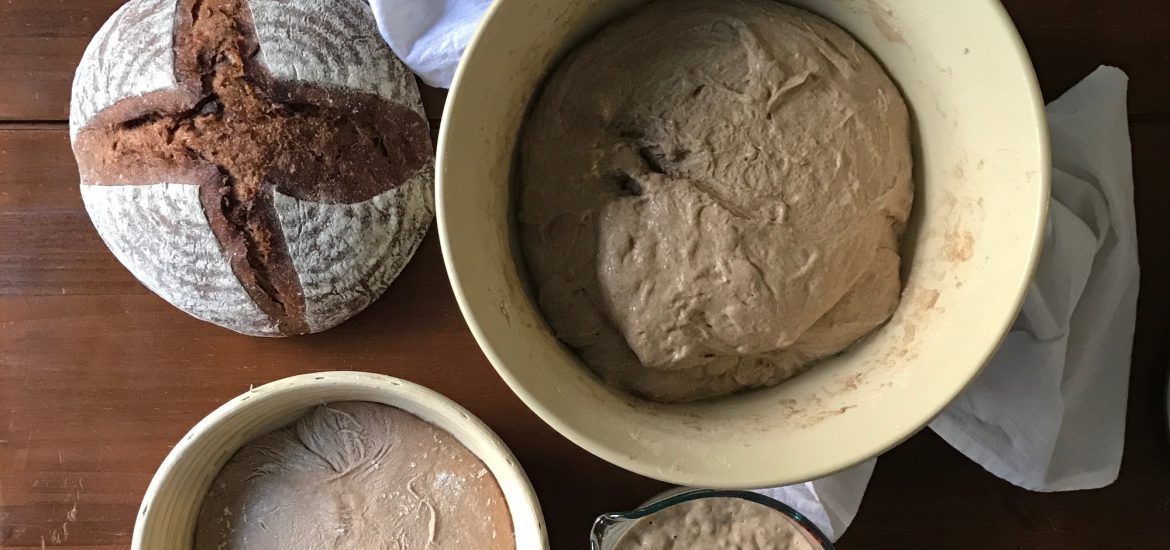
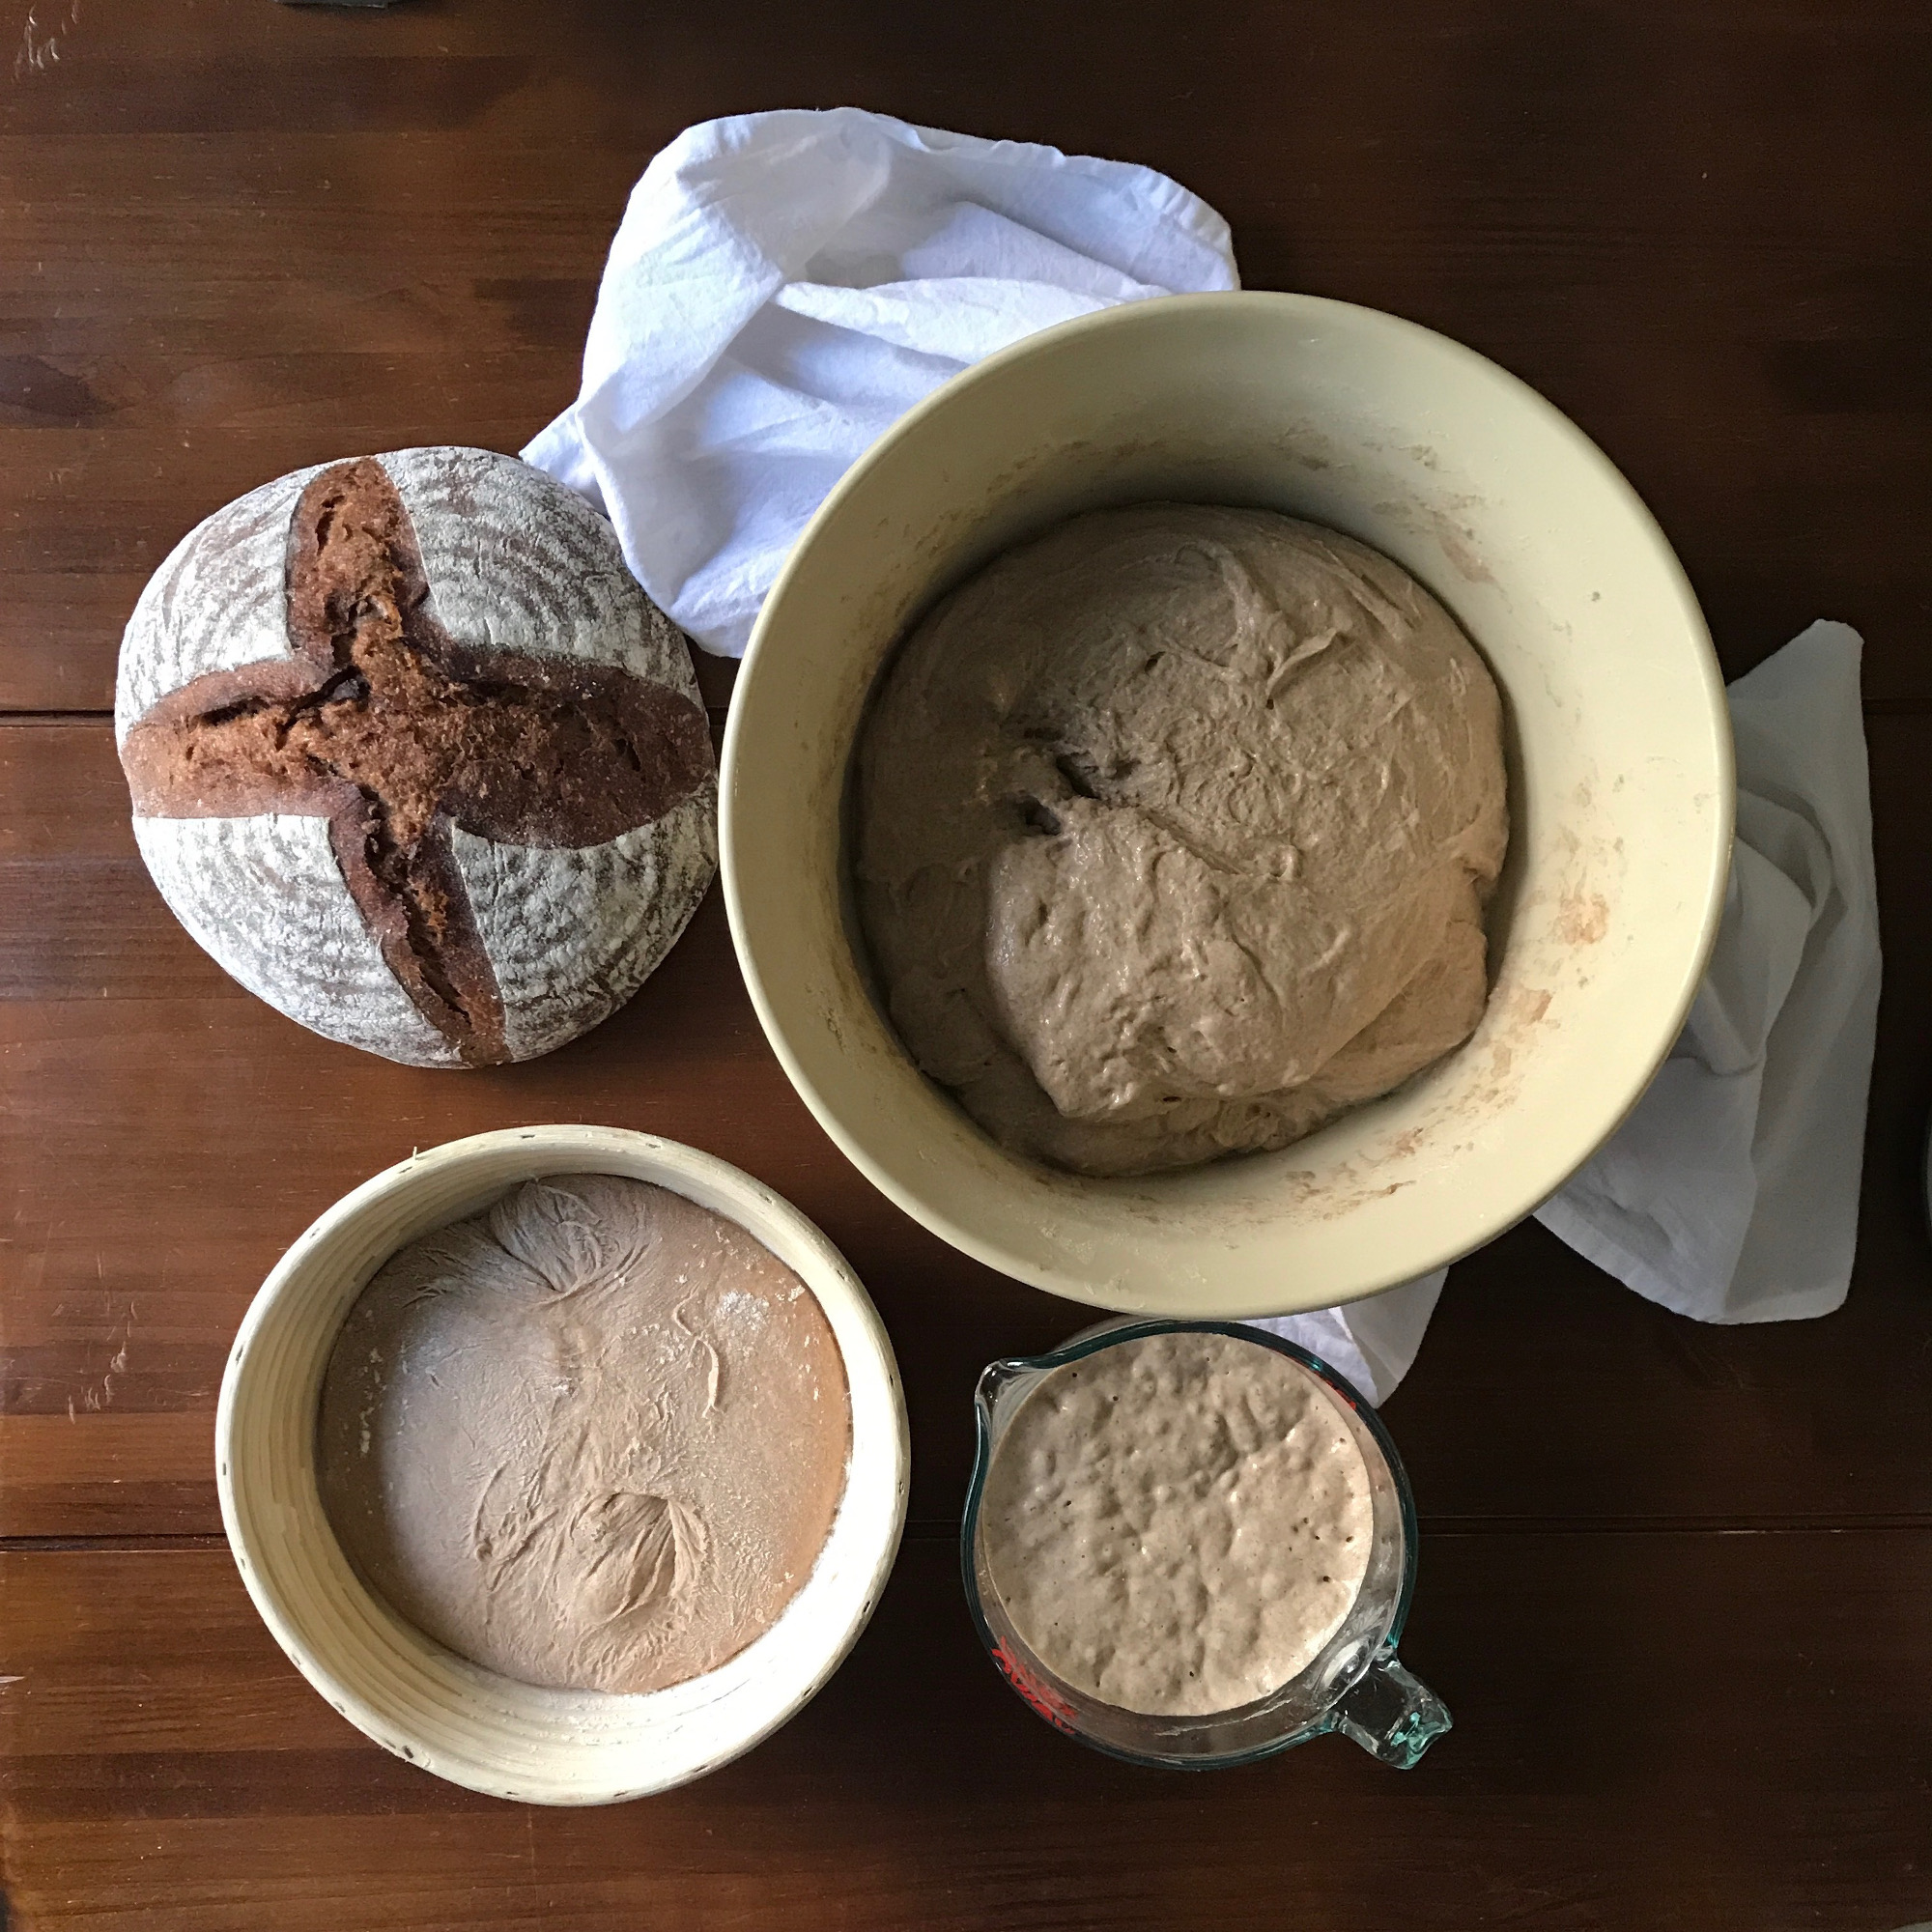
- Banneton baskets. I proof my loaves in these wicker-like spiral baskets. I had trouble tracking them down and they cost about $25 each (not cheap). I have two baskets, so when I make three loaves, I just use a towel-lined bowl sprinkled generously with flour to proof the third loaf. Works well.
- Razor blade or lame. The razor blade for scoring changed my life. With a good score, the bread can expand more, resulting in a better rise.
- Dough scraper. Use this to clean your cutting board and to flip your dough around. If you have a limited budget, this is the one thing you might want to splurge on.
- Silicone spatula. I use these to scrape down the very sticky sourdough starter.
(Go here for making sourdough bread without the expensive equipment.)
This is based on Michael Pollan’s recipe from his fabulous book Cooked: A Natural History of Transformation. He bases his recipe on Chad Robertson’s in Tartine Bread. I love both of these books. The pictures in Tartine Bread really help you along BUT the recipe spans about 26 pages (and you thought my post was long!). Michael Pollan’s is about four pages. Tartine also offers many delicious variations, such as the coriander raisin bread pictured below. (Oops, I accidentally used cardamom in these loaves, which tasted great.)

Ingredients for Two Loaves
I often grind fresh flour for my bread. I use only about 20 percent freshly ground as it tends to make a dense loaf. If you use freshly ground flour, grind it immediately before using as the oils in the grain turn rancid quickly. That’s a blog post for another day…
For the leaven:
- 100 grams whole wheat flour
- 100 grams white flour
- 200 grams warm water
- 35 grams recently fed sourdough starter
For the sourdough:
- 600 grams whole wheat flour
- 200 grams white flour
- 200 grams spelt or rye flour
- 750 grams warm water (adjust as necessary)
- 1/2 the leaven
- 25 grams salt combined with an additional 50 grams warm water

Directions
Try to do the following as you work on your bread:
- Take lots of notes
- Smell and taste the dough at its various stages—the smell, taste and feel all serve as clues to the dough’s progress
1. Begin with active, fed sourdough starter. I usually feed mine twice before I bake, once first thing in the morning and later in the early afternoon. I then start my bread in the evening with my active starter. (Sometimes I will only feed the starter once before starting the bread.)
2. The night before you make your bread, in a glass or ceramic bowl, make a leaven (basically a giant starter). Combine 100 grams whole wheat flour, 100 grams white flour, 200 grams warm water and 35 grams fresh starter. Cover with a plate to prevent crust from forming on top and place in a warm spot.
3. Soak the flours for the dough at the same time as you make your leaven. In a large glass, ceramic or wooden bowl, combine 600 grams whole wheat flour, 200 grams white flour, 200 grams rye or spelt flour and 750 grams warm water. Cover tightly with a plate to prevent a crust from forming on top. (You don’t need to place this in a warm spot as with the leaven and it may dry out if you do.)
Pollan’s recipe calls for more water in this step—850 grams. I would suggest you start off with less and work your way up to more as you get more experienced at baking this. Even with the smaller amount of 750 grams of water, the very wet dough can freak new bakers out.

4. In the morning, combine 1/2 the leaven with the soaked grains. I use my hands to work everything in together. The remaining leaven is your new sourdough starter. The starter that you made your leaven with now goes into your discard jar along with all the other excess starter left over from feedings.
5. Combine 25 grams salt with 50 grams warm water and set aside.
6. Wait 20 minutes. Add salty water to dough and thoroughly mix it in with your hands. The bulk fermentation begins now so note the time.
7. Wait another 20 minutes. Turn the dough for the first time. Wet your hand, reach under to the bottom of the dough, pull it up and fold it over on itself. Turn the bowl 1/4 of a turn and repeat for a total of at least 4 turns.
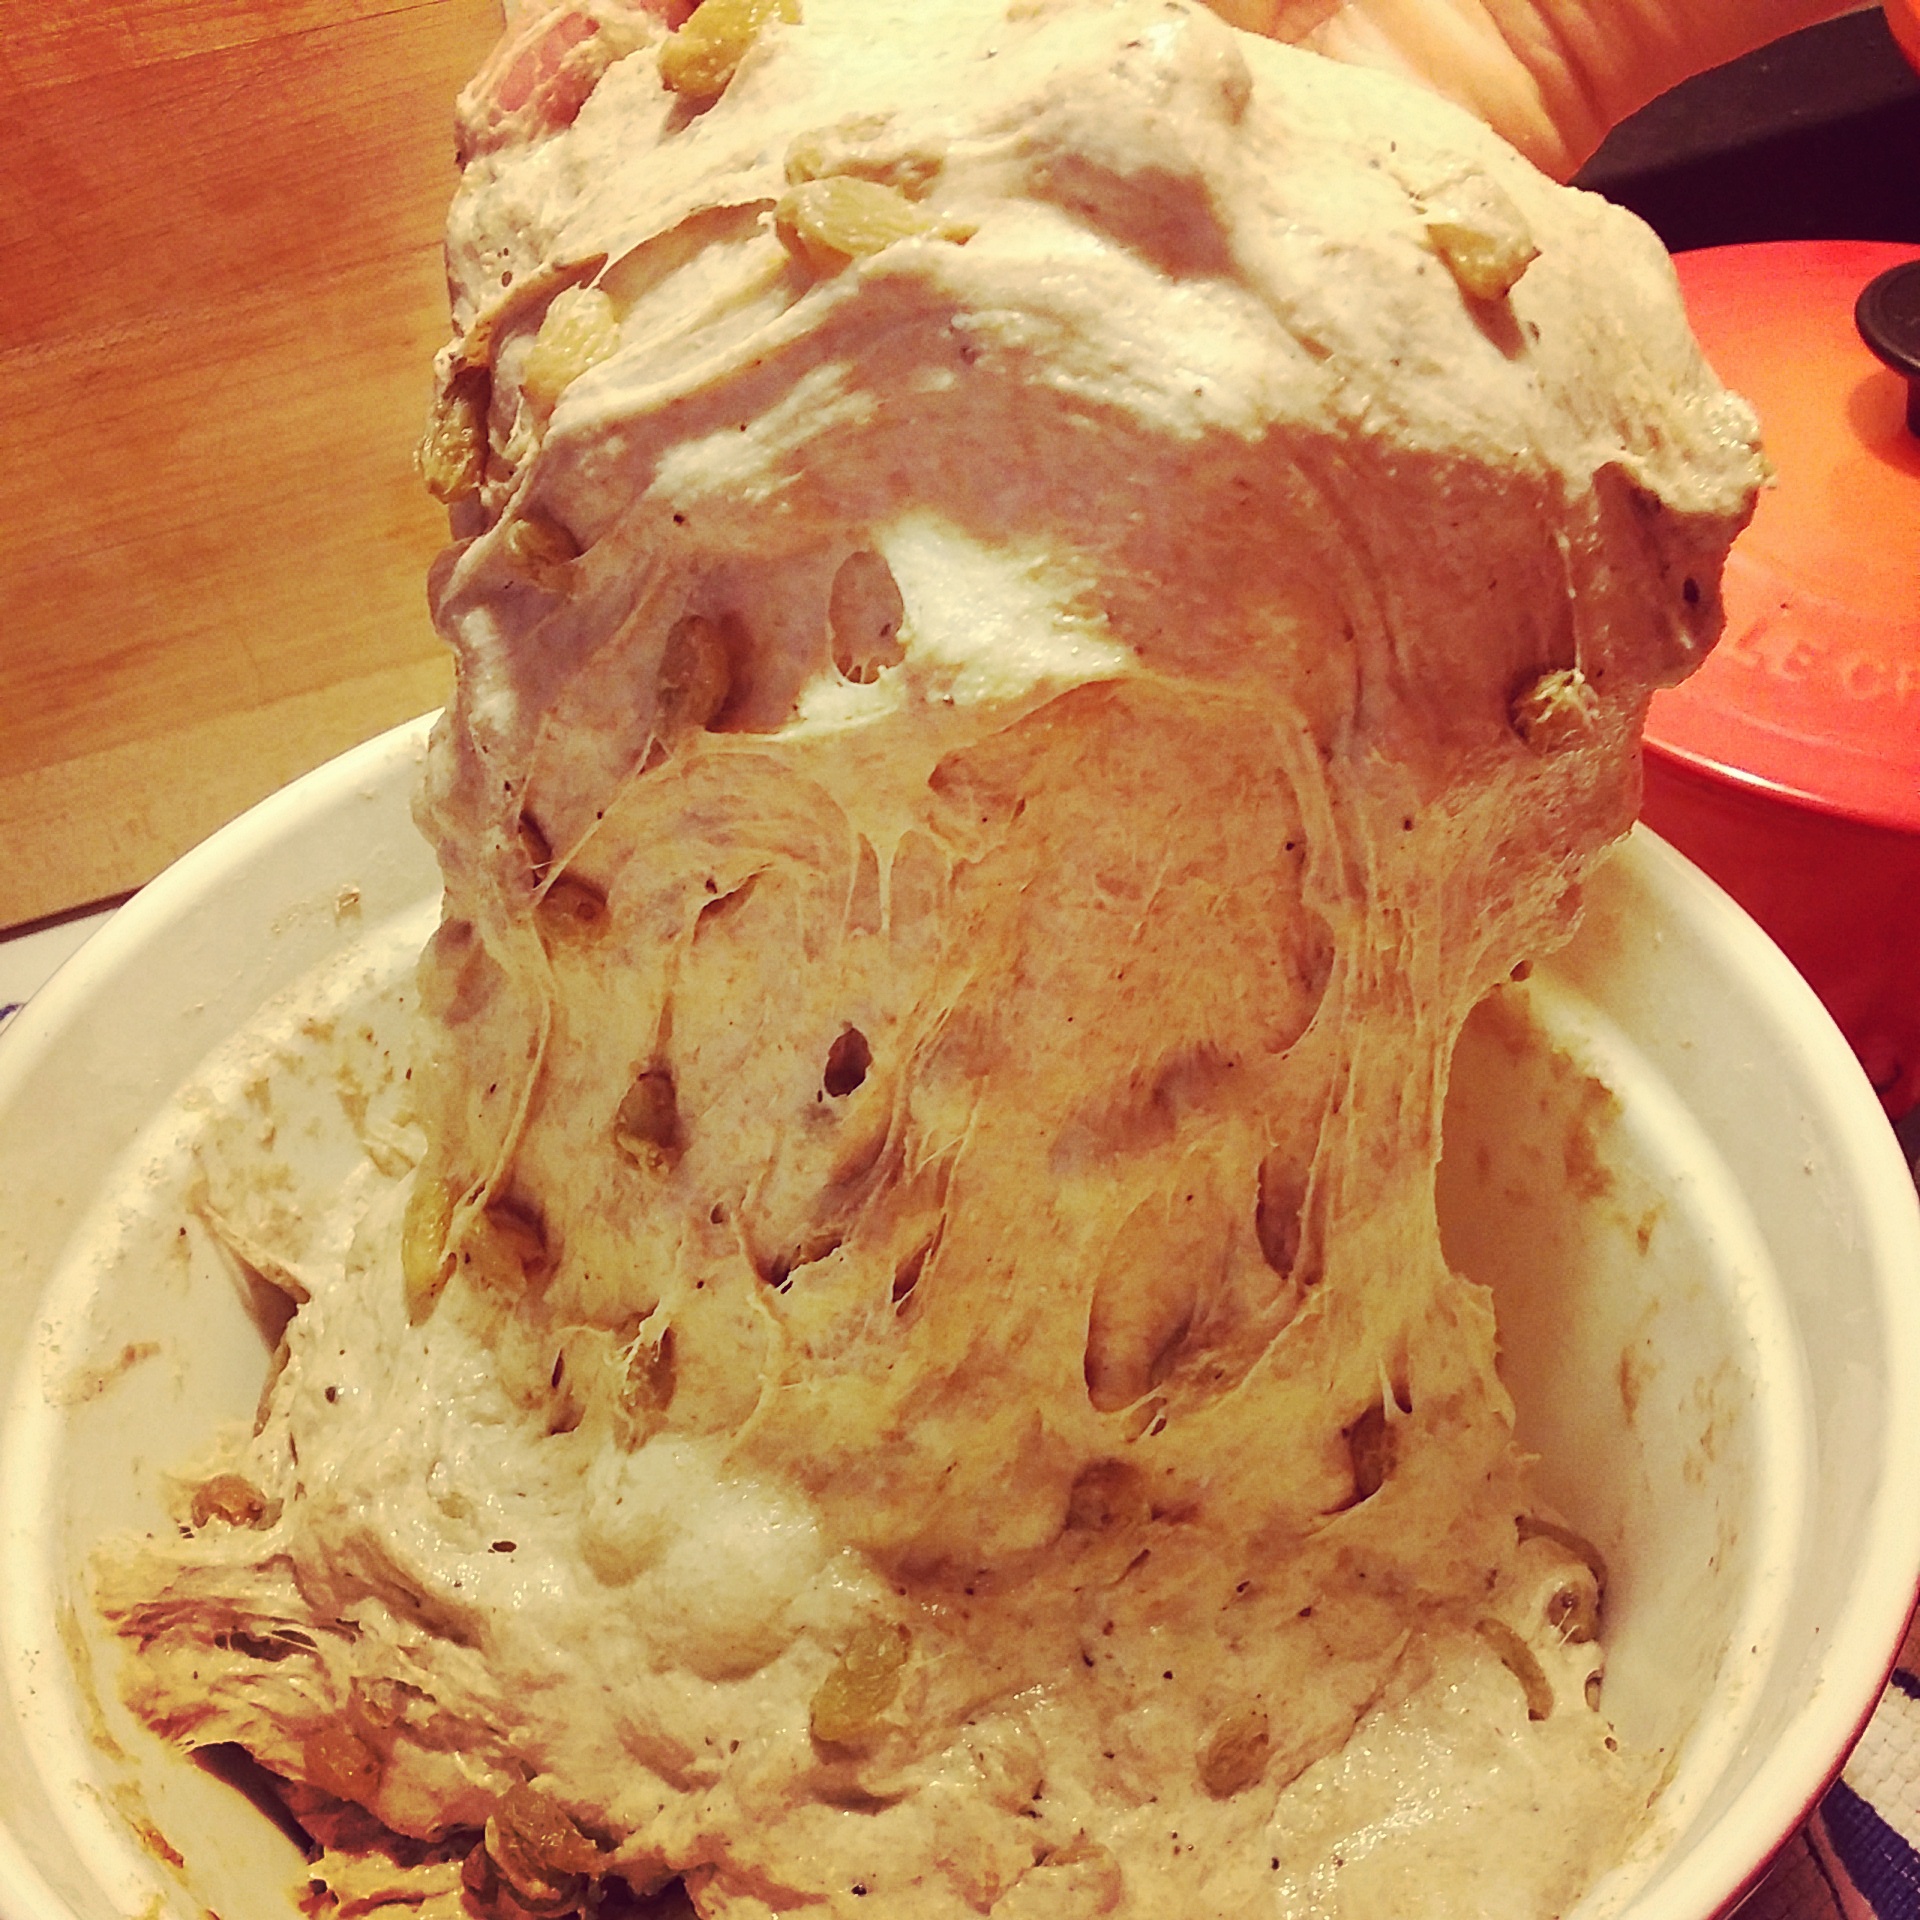
If you want to add seeds, nuts, olives or raisins, do that after the second turn of the dough.
Seeds: Fennel, sesame, sunflower and flax seeds are good choices. I use about 1 ½ cups total. Toast for 10 minutes in the oven at 350 degrees Fahrenheit. Then, soak the seeds in about 1 cup warm water for 30 minutes before adding to dough. The seeds will absorb this water. If there is any remaining water, strain it out. Soaking plumps these up. They taste so good. Skip this step if you prefer though.
Nuts: Toast as with seeds until fragrant. You don’t need to soak nuts after toasting but chop whole ones into small pieces.
Olives: Chop into smaller pieces if whole.
Raisins: Soak 3 cups golden raisins in warm water for half an hour and strain before adding to the dough.
8. Continue to turn your dough every 30 to 45 minutes.
9. End the bulk fermentation after 4 or 5 hours. My dough begins to break down around 5 hours so I rarely go past 4 1/2 hours. Your bulk fermentation may require more or less time, depending on your kitchen environment.
10. Generously flour a wooden cutting board or your counter top.
11. Dump dough onto work surface and halve into 2 blobs.
12. Sprinkle with flour and with your hands, rotate each blob gently while pushing the sides toward the bottom of the blob. Don’t work the dough any more than you need to in order to achieve this.
13. Cover with a towel and wait 20 minutes.
14. Sprinkle your work surface with more flour. With your dough scraper, flip a blob over. You’ll now shape your loaves. Pull gently on one end of the dough to form a rectangle. Fold the dough in half. Pull gently on the ends (i.e., not the folded side) to form a rectangle again. Fold over again. Turn the dough 90 degrees and repeat this folding. Now turn the dough diagonally. Make a rectangle, fold it. Make a rectangle in the opposite direction, fold it. Turn the dough 90 degrees and repeat this folding.
You have folded the dough a total of eight times. This creates a tight loaf and helps create a better rise. But be gentle! Don’t pop any air pockets. These are gold! The dough gets more difficult to fold as you continue to fold it. This is the trickiest part. Don’t worry, your bread will taste great 🙂

15. Sprinkle banneton baskets or cloth-lined bowls generously with flour. Place formed loaves in baskets, top side facing down. When you drop the loaf into the Dutch oven, the smooth side will face up. Cover the loaves with a cloth.
16. Proof the shaped loaves. I get the best results from an overnight cold proof in the refrigerator. This overnight proof gives you a break BUT you can proof now for two hours at room temperature and then bake as outlined in the next steps.
17. After proofing the loaves, place the Dutch oven in the oven and heat at 500 degrees Fahrenheit for 15 minutes. If you have refrigerated your loaves, remove the first one from the fridge before you turn on the oven. My Dutch oven is very large—6 1/2 quarts. A smaller one will do.
18. Pull the Dutch oven from the oven and remove the lid. Hold the basket above the pot. Drop in the loaf being careful not to burn yourself.
19. Score the loaf using a razor blade on a stick or a store-bought lame. I prefer the razor-blade-stick combo as the blade on the lame is not usually replaceable. Put the lid back on. Return the Dutch oven to the oven.
20. Reduce the temperature to 450 degrees.
21. After baking for 20 minutes, remove the lid. This is the moment of truth. Hopefully your dough has risen nicely. Before I peer inside, I ALWAYS feel a little anxious! I doubt this will go away…

22. Bake another 23 to 25 minutes without the lid, until the crust of the bread has browned and caramelized.
23. Place baked loaf on cooling rack.


24. If you did an overnight cold proof, pull the second loaf from refrigerator.
25. Place Dutch oven with lid on top back in the oven. Heat the oven to 500 degrees for 15 minutes.
26. Repeat steps 18 through 23.
27. Devour bread after it has cooled. Resist the temptation to tear into it. The bread continues to bake after you remove it from the oven.


What are the quantities in cups/tsp/table etc. Not good with grams 🙁
I will measure in cups when I bake again this week Karen and let you know. It will be an estimate. That would be great if you tried it with cups. People have baked this for thousands of years without digital scales. They probably didn’t have my OCD though 😉 By the way, for water, 100 grams = 100 ml.
Hi ZWC!
I’m wondering if you ever got around to trying this/measuring the recipe with cups & tablespoons? I’m keen to get on the sourdough breadmaking bandwagon (I just received a started from a great restaurant!) however I’m a bit wary to purchase kitchen scales until I know I will be regularly using them. Don’t need another kitchen appliance that sits in the corner cupboard, etc. Thanks in advance!
Jax
Hi Jax. No I’m sorry I haven’t. And I just made bread on the weekend. The next time I bake, I’ll weigh it and then measure it. I understand your hesitation to buy a kitchen scale. I hate to tell people to buy more stuff!
Thank you, thank you!
Wow! This sure does seem like a lotta work but I’ll bet the results are more than worth it, right?
Well, yes and no. You babysit it and the microbes do the work during the 4 to 5 hour bulk fermentation. Plus no kneading! When I used to knead bread with commercial yeast, I almost wanted to pass out, I’m such a weakling. It does take longer to produce a loaf though. You just have to plan ahead. If I want bread on Saturday, I make my leaven Thursday night. And, yes this is delicious!
You had me at “no kneading”. 🙂
Why do you soak the grain / flour? Does this do something to the gluten?
Sorry I have been so slow to respond. I had to look this up because I forgot why I soak the flour…So, soaking softens the flour and results in a more voluminous loaf. I have made the bread a few times without soaking the flours the night before (I was too tired…) and it still turned out just fine. The bulk fermentation does result in less gluten from what I’ve read. Even people who can’t tolerate wheat tell me they can eat this bread. I think a lot of people who are gluten intolerant are actually bad bread intolerant. The commercial stuff isn’t prepared properly.
AM, this is great! We are wanting to make sourdough bread with fresh ground flour, but the differences in hydration and texture have us stalled…we’ll give your method a try. One question I can’t seem to find answers to elsewhere: when using the dutch oven for baking, do you bake one loaf at a time? Is the other one ok sitting for the extra 1/2 hr? Or do you have 2 pots to cook them at the same time? Thanks!
Hi sorry I am slow to respond! So I do bake one loaf at a time. I actually do own two large Dutch ovens (a neighbor gave me her very old, awesome family Dutch oven) but a very tiny oven so I can fit only one in there at a time. The other loaf is fine to sit for a while. I almost always do a cold proof in the refrigerator and I’ll put the second loaf out only after I have baked the first.
The freshly ground flour has thrown me off too. I have used only 20 percent because it is very heavy. I read that a finer grind is less nutritious (the molecules aren’t destroyed as much) BUT I want my loaves to actually rise. So it’s a big balancing act. I also don’t want to use much white, but there’s the rise thing. I think I could continue to bake this once a week for the next 10 years and still learn something new every time!!! Happy baking and thanks for the comment 🙂
Thanks so much for posting this!
Perhaps you can help me. My biggest problem is bread collapses when I transfer to dutch oven. Does this mean I’ve let it over rise?
Oh that happened to my last loaf Aggie. The loaves spread out and looked like Jabba the Hut 🙁 They were PBFs (partial bread failures) but they still tasted delicious.
I think you may be on to something and they proofed too long. With my disappointing loaves, I think I let the bulk fermentation go a bit too long. I could feel from the dough that it was starting to kind of break down a bit–it seems to kind of reverse course when I let it go too long and become less billowy. Then I think I let the cold proof go too long. So the next time I bake, I’m going to stop the bulk fermentation earlier and also start my bread later in the day so it proofs less in the fridge overnight.
I hope that helps. Please let me know! It would help me too 🙂
[…] si l’aventure vous intéresse, vous pouvez commencer ici pour le levain et ici pour le pain (en anglais) ou ici pour le levain et ici pour le pain (en […]
[…] HERE is the recipe I used as my basis. She recommended taking notes on the process, and here are a few of my trial and error findings: […]
Nice post! I became inspired to try to bake again sourdough bread.
How big are your Banneton baskets?
Thanks!
Thanks for checking it out Claudia. My baskets are 9-inch. Happy baking 🙂
why make double the amount of leaven? If I use 35 grams of the starter, I still have starter left, why do I need a new starter.
Well you could feed the remaining starter after you remove 35 grams from it. If you double the leaven, you have essentially fed the starter and you use that as your new starter. So you can do it either way. When I keep my starter out on the counter I feed it every day, so when I make my leaven and use half, I have fed my starter its next meal. I hope that makes sense. It sounds kind of like a “who’s on first” thing 😉
Never thought of using the dutch oven for sourdough loaves. Ingenious. What size banneton do you use for the round loaves?
I love love love my Dutch oven. My baskets are 9-inch.
I’ve LOVED having your instructions. More clear than most. AND I’ve followed carefully. But my dough is too wet to mess with as I begin fold process. OK to add a bit of flour now?
Hi Betsy. The dough is VERY wet. Sprinkle LOTS of flour on your work surface when you dump it out of the bowl. That should help. The first couple of times I made this, I thought I had done something wrong, the dough was so wet. Then I piled on the flour when I got to the stage when I started forming the loaves. That made a huge difference. I hope that helps!
I have the same problem but I don’t understand your answer. Like Betsy my problem is that the dough is to wet to fold. When I try the only effect is that all of the bubbles breaks and the dough shrinks down to nearly starting size. Should flour be added during the folding?
Hi Jules. It sounds like you need to stop the bulk fermentation sooner. If the bulk fermentation goes too long, the dough will break down. Let it go even longer and eventually your dough would revert to a leaven. I hope that helps. ~ Anne Marie
When you say “recently fed starter” for making the leaven, what does that mean? How recently should it have been fed?
Hi Sarah. I usually feed my starter in the morning and make my leaven at night, so I would say within 10 to 12 hours, maybe even fewer. You want the starter to be lively when you use it for the leaven. ~ Anne Marie
AM when would you add the raisins? During the soaking of the grains or when you add the starter and salt water? Also, any tips on how to prevent the loaf from sticking to the Dutch oven? Thanks! I’ve made this 3 or 4 times and every time it tastes better than the last. Thank you for this recipe:)
Hi Adriana. Add the raisins after the second turn and your fingers to squish them through the dough. Also, soak the raisins for 30 minutes before you add them. The raisin bread is SO good–better than cake! I haven’t had much trouble with the loaves sticking to the Dutch oven. I think once a small area on the bottom of the loaf stuck and I tore the bread when I forced it out 🙁 The raisins do stick a little bit. You might have a few little burnt spots on your pot. You could try oiling your pot I suppose. I haven’t tried that. If you do, will you please let me know how it goes? I’m happy to hear your loaves are turning out well. Thanks for checking out the post 🙂
Thank you so much, I will!
I have been playing with your sourdough for a couple weeks now. I love the chemical change that happens when I add the salt water to the dough. I wasn’t sure from your instructions, though: When I add the salt water, do I let it sit on top of the dough? Or work it slightly in? Or work it thoroughly in? I had been working it thoroughly in, but now am thinking that kills the bubbles, so maybe you intended to wait the 20 minutes after pouring the salt in, and then mix it in as part of the turning.
Hi Lynne. I love that change too. I find baking this way fascinating. When you add the salty water to the dough, mix it in thoroughly with your hands, then wait 20 minutes and make your first turn. Thanks for letting me know about this. I’ll go update the instructions right now.
[…] followed the process used by the Zero Waste Chef but using flours I had at home (a white bread […]
Thanks so much for the recipe and inspiring me to take more steps towards a plastic-free life! Can you suggest a way to store a loaf? My husband swears by the plastic bag for this need.
Thanks for checking out my blog, Jenny. In Cooked, Michael Pollan says to store the bread in paper, not plastic. So you can try telling your husband that but he may not take Pollan’s word as gospel like I do 😉 However, sourdough does stay fresh longer than bread made with commercial yeast. I used to bake with commercial yeast and the bread was delicious but it was stale the next day. This is fresh much longer, I would say up to a week. I store it in cloth produce bags I made (most of them are cotton) and they do the trick. I also freeze the bread in them. We eat the bread pretty quickly, usually before it goes stale though.
Using cloth bags is an excellent idea!
Hi AM, I have been loving your bread recipe and have tried several variations with mix-ins:
Chopped dates & chopped walnuts (favorite!!)
Dried cranberries, pepitas & rolled oats (other favorite!!)
Raisins (dark & golden), chopped walnuts & pecans, cinnamon
I feel like I have died and gone to heaven, This is what bread should be Of course, the original is more airy and sooooo good. The ones I did with mix-ins were more dense and there were less air bubbles, but I guess that’s to be expected? When did you add the raisins to your raisin coriander loaf? I split the dough in two after the second turn during bulk fermentation so I could add the different mix-ins and have 4 varieties to sample (I made 2 batches of dough so that way I used up all the leaven, and I saved some starter from the night before).
I’m thinking of gifting these for Christmas, perhaps splitting the dough in thirds or fourths to make mini boules…any advice?
Also, I get a rise out of the bread but it could probably be better (I bake it on an aluminum cookie sheet lined with parchment and sprinkled with cornmeal, 450F for about 20 min and then turn off oven, crack door and leave for another 5 min). All I have is a stainless steel dutch oven and I had a beautiful loaf get stuck…it came out eventually thank goodness but I avoid it now. (I totally coated the bottom in cornmeal but it spread to the sides and got stuck there.)
How deep should I make my slashes on top and should they cover the whole top area or just the middle…does it matter?
Thanks for everything you do!!
Hi, I found your post really helpful! I recently watched Pollen’s Cooked and am inspired to start up sourdough cooking again. After re-reading my Tartine cookbook and feeling overwhelmed, I found your website and am feeling slightly more up for it. My sticking point is the time it requires me to be home as I have 2 toddlers and we do a fair amount of running around. Any chance you have a write-up of approximate times of when you do all your leaven-making/bulk-rise/proofing? I like the idea of the overnight proof because I am assuming I can start the bulk fermentation in the afternoon when my kids are home napping, but then when do you make your leaven? I don’t think I’m dedicated enough to get up at 5am to start the process…Any input is appreciated. Thanks!
Hi Amanda, I’m glad you’re going to try again. I haven’t added times to this. Tomorrow I am going to make the dough. So, I usually make the leaven at night pretty late, around 8 or 9pm (that’s late for me…), then I will start the dough in the morning, around 7am or maybe 8am. I’m done by 2pm and then I wake up at 5am to bake the next day (usually). The last couple of times I made bread, I finished the dough early (by 1pm or so), did the cold proof in the fridge until about 8pm and baked that night. I love the cold proof. Not only does my bread turn out better but it buys me a bit of breathing space. I can put the dough away for a while. I hope that helps! Oh another thing, take lots of notes! Then you will figure out what times work best. Everyone’s kitchen is different. Enjoy! ~ Anne Marie
Hello Anne Marie, I successfully got my starter going and am in the process of planning my baking schedule. Are there any steps that can be “paused” in between; or do they all have to immediately follow one another?
I put together a spreadsheet to help me envision the timing + planning, in case it helps anyone else: https://docs.google.com/spreadsheets/d/13SnzQyaproT_a7sIA1OeXl7bEq3yjc8bjJ0C6ywVCCA/edit?usp=sharing
[…] this point, I followed this bread recipe, which contained primarily whole-wheat and rye flour. A small amount of all-purpose […]
[…] used different versions, but for starters I would suggest you check out Anne Marie’s (the Zero Waste Chef). Check out her other incredible, helpful, and sometimes edible posts, […]
What size dutch oven works well? Is 6 quart too big?
Six quart will work. Mine is a 6 3/4 quart oval.
Hi
I have tried to bake this bread 3 times now. It continues to be disk in shape, not a nice dome shape. I have read and read about others having this but I am not sure what I am doing wrong. Is this what is referenced as poor “oven spring.” Please advise.
Hi Vickie. I think you’re right. It sounds like poor oven spring. I baked the (near) perfect loaf several months ago and it has evaded me ever since. My bread is still very good and way better than my first several attempts, but it always turns out a bit different and now that I’ve baked that really good loaf, I’m a little ruined 🙁 But I keep trying. I suggest you take lots of notes while you bake. Also, you may want to add more white flour. I also find that rye flour makes a more vigorous starter. So you may want to add more rye and a little less whole wheat to your bread. How long do you let the bulk fermentation last? I had been letting it go way too long at first and my loaves suffered. If you can get your hands on Michael Pollan’s book Cooked or Chad Robertson’s Tartine, those will help too. I hope this helps. ~ Anne Marie
Thank you for writing back. I was using Pollan’s recipe the first 2 times. Then went to Chad’s. Bulk ferment varies from 4 to 6 hours. I used Chad’s 1st book’s recipe and Pollan’s book recipe. Oh well. By the way, I wrote on the crackers section about adding cheese. Turns out all preferred the sharp cheddar addition over the parm. The crackers disappear.
You’re welcome. I love the cheese idea. Thanks for the update about the sharp cheddar. My kids (and I) would love that.
[…] Esto lo leí en Cooked de Michael Pollan, tenéis una adaptación de su adaptación del Tartine bread de Chad Robertson aquí ↩ […]
[…] recipe I use is my own modified and tweaked version of Zero Waste Chef’s recipe (found HERE), which itself is taken from Chad Robertson’s Tartine Country Loaf recipe (found HERE). If […]
Hello there, like a lot of folks here I just finished watching and reading “Cooked” and my wife and I already have starter going, it’s gonna’ get its first feeding today! I see this is a blog post from literally years ago, so I hope maybe you get alerts when a new person comments 😉
All we have to cook with is a cast iron pan. We’re not in a position to be purchasing cast iron anything else right now either unfortunately. Our oven strikes me as a good one though, it heats fast and whenever I open the door to check something, I get blasted with hot, moist air, which leads me to think that it seals nicely. Will we get a proper crust and all if we can’t cover our loaf? Also I wonder if we need to cook at a different temperature for the same reason…
Thanks much in advance!
Hi sorry for the slow response. I LOVED the book and the show. Michael Pollan is my hero…
I know other bakers who don’t use a cast iron lid. I would just try it (which you may have by now). At worst, I imagine you’ll get a crust that’s a little pale. You are not the first person to ask me this. I really have to try baking with the lid off to see what happens. Enjoy your bread baking adventure 🙂
🙁 Made this twice and turned out poorly both times. Disappointing. Flat blobs of unshapeable glop, even using slightly less water than the recipe called for. I’m a novice, and I’m sure a baker with some experience would know right away what I’ve done wrong. I’ll have to find a recipe for ‘easier’ sourdough.
I had at least a couple of unwieldy blobs when I first started baking this. I don’t think I actually cried but early on I made LOTS of dough that left both me and the bread completely deflated 🙁 Use TONS of flour on your work surface. I use less water than the original recipe because it’s produces a shockingly wet dough. Also you may want to try ending the bulk fermentation sooner. It may be fermenting quickly in your kitchen. If the bulk fermentation goes too long, the dough starts to break down into an unmanageable mess. If you do try again, you could also cut this recipe in half and try just one loaf. Good luck in your quest for a good loaf 🙂
Hi! How do I know when bulk fermentation process is done?? I am worried I will let it go too long and ruin my first loaf!!
Hi Austin. I ruined several batches at the beginning by taking the bulk fermentation too far. When you are just starting out, I would suggest going by the clock. So let it go between 4 and 5 hours. After you’ve done it a few times, you’ll know how the dough should feel. I would also take a pic on your phone when you start the bulk fermentation. When it has risen a decent amount (maybe double or not quite) and you hit four hours or a little more, you can stop. I wish I had a better answer, like when it looks like x, do y. I would also suggest you take notes while you work on it so you can figure out what works and what doesn’t. You’ll notice the dough changing. Around the second or third turn of the dough, it should start to feel stretchy. When it’s ready, it will be billowy and have some large air bubbles in it here and there (maybe 1/2 inch diameter or more). Not a ton (although if you get a ton, I am jealous). You’ll know it has gone too far if you see the gluten strands kind of falling apart and the bubbles collapsing. By then, it’s too late, so I know this isn’t the most helpful information. I hope this helps. It’s a bit of a rambling answer. I sound like a bit of a witch casting spells… Remember what Michael Pollan says, even bad bread tastes pretty good! Good luck! ~ Anne Marie
Thanks so much for your reply. I am at a crossroads here as I am at the 4 hour mark of my bulk fermentation and my dough is still quite sticky and stretchy, with not too many bubbles formed. I guess I will leave it for another 30mins for now and see how that goes. Hopefully all goes well!
You’re welcome. The dough is shockingly sticky! Use tons of flour when you dump it out. That was something else I learned the hard way. I don’t get tons of bubbles. If you have some, that’s a good sign.
Hi AM, This is my second time trying this bread. The first time, I attributed my dense loaf to an immature starter. The second time around, my starter was doubling in hours, so I’m sure it was matured. I don’t think that the bulk fermentation process is working out, and it doesn’t really feel like much is happening, and it doesn’t rise much then or in the final proof. My bulk fermentation process takes place at normal room temperature, about 20C. The loaf comes out with a burnt bottom, and is very dense. Any thoughts??
Hi Matthew. Your kitchen may be a little cool. How long did you let the bulk fermentation go? Maybe you need to wait a little longer. Also, what kind of flour do you use? I would love to say I use 0% white but I seem to need it to get a better rise. As for the burnt bottom, how did the rest of the loaf look? Was it also very brown? I’ve had a loaf stick to the bottom of my pot a couple of times and burn. I don’t know why this happened. It has been very rare. Oh and do you do a cold proof? I found this made a big difference in my bread. There are so many variables at play. If it’s any consolation, I made many, may dud loaves at first. I hope your next attempt works out better. ~ Anne Marie
I’m a novice. What is a recently fed sour dough starter? Do I buy it? Sorry to sound so dumb.
It’s not a dumb question at all. When you make a sourdough starter, you have to “feed” it fresh flour and water, ideally daily. That keeps it healthy and vigorous enough to make your bread rise. When you make the bread, you want to use starter you’ve recently fed. Here is a post with more info on that: https://zerowastechef.com/2017/04/11/prevent-sourdough-starter-taking-life/ I hope that helps. I found this all very confusing at first. Once you’ve done it a few times, you get the hang of it.
I’m making your sourdough bread recipe for the first time today (just started the bulk fermentation and so far everything looks great!). There’s just one thing that I’m confused by, if you could please help! When I made the sourdough leaven, using 35 grams of my starter, why do we make so much and then only use half? You say the other half now becomes my “new” starter, but using your 40 grams each flour/water recipe for daily feedings I still had more than enough original starter leftover. The majority of this is now going to just end up in my discard jar in the fridge (which I’ll use, thanks to your delicious recipes for this!) but would it make more sense next time to just reduce the leaven by half??? Thank you!
Hi Jolene, I hope your bread turned out really well. So I have started doing this a little differently since I wrote the bread post. I used to feed my small starter a few times before making the leaven, at which point I would add what was left of my little starter in the discard pile. Then I would use half of the fresh leaven as my new starter. But it’s a lot of starter. So now I just keep feeding my little starter in the background, even when I’m making a leaven. Then I make a leaven half as big as in the post and use the whole thing up in the bread. If you use your whole leaven and you don’t have a starter, you’re in trouble (which I think someone on social media told me she had done once…). So yes, just make half the leaven and use it all and keep your little starter going. ~ Anne Marie
Love your blog!! I’m wondering how you store your bread after you bake it? What keeps it the freshest? Bread box, wax wrap, paper bag? The question is all in an effort to stop relying on ziploc bags!
Ooo! someone asked the question already, I just found… got the answer I was looking for!! Thanks for all you do on here! So inspiring!
My pleasure Chelsea. I’m glad you found the info you needed. ~ Anne Marie
Hi Chelsea, I get this question often. I make sourdough bread and it keeps longer than bread made with commercial yeast. I store it in a cloth produce bag at room temperature. Sometimes I freeze it whole (also in a cloth bag). I find it dries out if I slice it before freezing. I think a wax wrap would also work well. I have a few but they are too small for bread. ~ Anne Marie
[…] Linking through several gravitars, lead me this site , The Zero Waste Chef(Link)https://zerowastechef.com/2015/09/17/sourdough-bread/ […]
I finally made my first two loaves today following your instructions! I have yet to do the taste test (will be done in the morning) I was so nervous during the process until I took the lid off in the oven and the loaf had risen perfectly and looked so great already. The moment of total pride and joy after many hours!
I do not have a dutch oven so I actually used my tagine – which I think (at least until my taste test tomorrow) could be an option to get more use out of the tagine if you have one. Instead of proofing baskets I used my wok and a colander with kitchen towels inside. But something I really want to invest in asap is the kitchen scale and a dough scraper! I really think those two tools will make the process a lot smoother.
Hi Matilda, Thanks for the feedback. I’m happy to hear your bread turned out well. Someone asked me recently if she could use a tagine to bake her bread. Now I know! I am always nervous right before I remove the lid! I don’t think that feeling will ever go away! I like my baskets but they certainly aren’t necessary. I love my dough scraper and scale though. I use them constantly, daily for the scraper. Enjoy your baking adventures 🙂 ~ Anne Marie
Hi Anne Marie! I’m a huge fan. I’ve been making your/MP’s sourdough for about three months now (I’ve also made our ginger beer, mead, crackers, and I have my eye on your sorbet). I’ve gotten pretty good at it and my results always have a good rise, a great taste, and a great look. I’m curious if you could give a little more detail on steps 12 and 14. I’ve looked up countless other sources for sourdough and have approximated what you mean from those but I would love to get your version just right.
Hope it’s not too much of a hassle. Thanks so much!
Oops! Your* ginger beer etc
Is there a text only version of this recipe somewhere?
Hi Lois. Sorry, this is the only post with the recipe. ~ Anne Marie
Hi there! I am gathering supplies to get started on this recipe. I was curious what size Banneton basket and Dutch oven you use? Should they be the same size? I have found a variety of sizes on amazon.
Hi Julie. My round banneton baskets are 9 inches. I haven’t tried using 8 inch ones, but wish I had one. My Dutch oven is very large (6.5 quarts). You don’t need one this big. I do love it though. Happy baking 🙂 ~ Anne Marie
I have made several loaves successfully – thank you for the wonderful recipe! I have a question though about the temp of the dough after a cold proof before popping it in the dutch oven. I have been letting the loaves warm up to close to room temp before putting them in the oven, but they definitely rise a bit while sitting out (for an hour or two). Is that how you do it? I just tried letting it warm for only about 45 minutes before baking, and it’s taking longer to bake. What is your preferred method?
Hi Kristin,
I’m happy to hear you’ve had success baking your bread. I haven’t been letting my dough warm up for long. I take the fist loaf out while the oven heats up (so about 20 minutes) and take the second one out after the first one has bakes (also about 20 minutes). You could take one loaf out and let it sit until it reaches room temperature and take the other one out closer to when you’ll cook it. Then you can compare the rise and flavor of the two loaves. I think that would be a fun experiment. Happy baking!
~ Anne Marie
I found an antique French Banneton basket (with a handle) at my local Goodwill for $2.99 in the “basket” section. I couldn’t believe my eyes! I have a loaf of kalamata olive bread in the oven right now. I think I let it proof too long (should have set a timer…), but it’s still looking good.
:O That’s the BEST FIND EVER! You must have had to rub your eyes when you saw that. Nice score!
How can you tell when the bulk fermentation is done? I’ve been turning my dough every 30 minutes for 4 hours when I bake, but I have no idea what signs to look for that say, “Ok, time to stop turning now. Begin the proofing.”
Hi Anne Marie! You have completely inspired me with the sourdough bread and I have made a number of batches now and am looking to branch out a bit with my loaves. Have you ever experimented with a higher % of all-purpose flour? I need a switch up from the heavier mostly-whole wheat bread. I’m thinking to keep the leaven as is, but then do almost all all-purpose for the rest of the flour? Less water I am guessing. Didn’t know if you might have any tips to share!
A few months old in the world of sourdough. I found your recipe after watching the Michael Pollan documentary. Instinctively, I felt this was going to be my favorite tasting bread. I was right. Up to this point I didn’t really follow recipes. I went by feel and lucked out getting some gorgeous loaves. I decided I would follow your recipe to the T. I found it so interesting that the dough almost had an oily feel to it by doing it this way. This is going to be my go to as I continue to expand into this arena. Thanks so much for your great instructions.
Thanks for the recipe and guidance/advice. One thing that would have helped me is knowing from the start that this is a two-loaf recipe. This is my first time and I only wanted to do one loaf in case I screwed it up (which it looks like I have, but we’ll see…)
Can you edit the info at the start of the recipe to make it clear that the proportions are for two loaves of bread? Also adding the dutch oven size to the recipe steps/equipment list will help – I know it’s in the Q&A below, but easier if it’s in the main flow.
Thanks for all your help!
Hi Dana,
Absolutely! I will edit the post right now. Thank you for the suggestions. ~ Anne Marie
Wow…fast. 🙂
My dough is looking like it has good bubbles in it during the bulk fermentation process, so maybe I’ll be OK.
Looking like this…I’m about 3 hours into it. Looks like I can stop at four hours?
https://www.dropbox.com/s/5uqjxr4qqbezdvc/20180703_122959.jpg?dl=0
Also a question…on step 12:
“12. Sprinkle with flour and with your hands, rotate each blob gently while pushing the sides toward the bottom of the blob. Don’t work the dough any more than you need to in order to achieve this.”
So you mean do this (rotate/push sides in”) for only one full rotation if possible? Not sure what I want to see to know I’ve done this step enough and can move on.
And when you say “…pushing the sides towards the bottom of the blob.” do you mean lift them and push into the center of the blob, or just try to push them along the surface towards the middle?
Thanks!
Hi Dana, You sort of rotate and push in on the bottom of the sides until you have a round blob. You don’t lift the dough. This video is really helpful: https://www.youtube.com/watch?v=cIIjV6s-0cA See 2:37 for the blob stage. ~ Anne Marie
I watched this video and was surprised that he didn’t heat the dutch oven beforehand, but just put the bread in cold. I ask because i have a really hard time getting the bread from the banneton into the hot dutch oven and have wrecked a couple of loaves trying this. Also, wanted to say that I store my loaves, and lots of other food items, in a large piece of beeswax wrap which works really well.
Hi there, I live in Mexico and the only widely available flours here are wheat and bleached white. I’m also trying Pollan’s recipe, and I’m about a week into my starter. However, I’m doing pure 100% wheat. Most of my googling has led to other recipes where people mix the flours, and I was worried that this was the only way. Then it occurred to me that in Mesopotamia they also only had one type of flour (i.e. the real deal).
Current status of my baby (I haven’t named her yet) is bubbly and frothy but still with some liquid between twice-daily feedings. I feel like I’m going to have finished 2 bags of flour by the time she looks like the photos of starter the internet has deemed ready to use. (Like you, I also wondered whether Pollan’s 100 grams was a bit excessive). Tonight I’ll try adding less after removing 80%.
All of this context to ask… how will the development of my starter differ by only using whole wheat flour? Should I do anything differently? When it’s finally ready for baking, will I see any drastic changes to fermentation or proofing times?
Hi Alex, Yes the 100 grams is a lot of flour. I do 40 or 50 now and have way less discard to deal with. I haven’t made a 100% whole wheat starter but occasionally I’ll feed my starter 100% whole wheat. I think if it’s rising and falling and getting lots of bubbles in it, yours will be fine. I don’t think you’ll need to make any drastic changes to fermenting or proofing times. I put only 20% max white flour in my loaves and occasionally sometimes only 15%. I do love to do an overnight proof though. You might want to try that. I hope it your baking goes well 🙂 ~ Anne Marie
I’ve been inspired by my DIL who is a whiz with sourdough. Thanks for posting MP’s recipe! Everything was going swimmingly until I tried to get the dough out of the banneton: sticky mess! Help! What can I do to prevent this from happening again? (NB – I ended up baking both loaves and they turned out pretty well and tasted terrific despite having to scrap the contents into the cast iron pan.)
Lots and lots and lots of white flour. Same happened to me with the towel in bowl method. I’ve only been baking with whole wheat flour, which it turns out is bad for dusting. So my counter and towels get disted with white flour, do the same for the banneton and it shouldn’t stick .
Hello,
The remaining half of the leaven is my new starter; but I still have starter left before making the leaven in the first place. So can I combine the two?
Hi Liselotte, you could but the leaven is fresher so I would just use that and find some other use for your starter (pancakes, waffles, crackers…). You can make the leaven half as large and use the entire thing so you don’t have any left over. That’s how I make mine now. ~ Anne Marie
Thanks for the reply! I used my sisters starter, so this first time I did make double the amount so now I have my own starter 🙂
Another question: my husband likes white bread; if I make this recipe with only white flour, does it change the amount of water I need?
Thanks, Liselotte
Hi there!
Have been recently following your blog, have a starter ready to go!
Getting ready for this next step. I actually used to bake bread often in culinary school, but that is years behind me! I have not done it at home which is such a different bear. I’m wondering if you’d tried baking on the grill at all? My oven actually fails to get much higher than 400 degrees.
Please advise!
Hi Carissa, I haven’t baked my bread on a grill but I would love to try (that and a campfire). If it gets hot enough, it should work well. If you try it, will you please let me know how it goes? Thanks ~ Anne Marie
Hi, Anne. I made my first loaves this weekend. I found this post and your Instagram stories very helpful. It was *almost* like you were holding my hand along the way, which I very much needed.
I don’t have a dutch oven yet, but yesterday I made one in a glass loaf pan (that I didn’t grease – yikes!) and the other on a stone with a metal bowl over it. The loaf puffed up beautifully, but I had to destroy it to get it out of the pan. The free-form loaf under the bowl stayed flat. Any thoughts?
Do you bake both loaves at the same time?
Hi! Is it recommended to once in a while make extra leaven, so to have a new starter – and do something useful with the old leftover starter of course. Or is it also fine to only make enough leaven as needed and to feed the remaining starter once a week when left in the fridge. And do this for years or something?;) depending on how long I’ll continue to make my own bread. So, is it wrong/worse to only feed your starter little bits for a long time instead of giving it a big meal every now and then?
Thanks! I still love this recipe😀
I am just now starting down the sourdough path- made my first loaves yesterday! I will definitely be trying your recipe next week. Your instructions are very clear!
Hi!
Loving your blog, quite entertaining and clear, helpful instructions.
My first sourdough starter (made using your tips) has just turned one month old and I celebrated the occasion by trying to bake bread.
Unfortunately my dough was very liquid. I followed your instructions carefully, only I used spelt flour. Any idea what the issue might be??
Hi Veronica,
Thank you for the kind words. Happy birthday to your one-month old 🙂 I love spelt flour but I find it makes VERY wet dough. I would add less water next time if you use all spelt. Otherwise, the dough is hard to work with. I hope that helps.
~ Anne Marie
I am very new to wild sourdough starter. I just began my starter on January 11, 2019, and just found your website a couple days ago. I was reading through these directions and wonder: so, you don’t grease the Dutch oven at all? I have a cast iron one I think will work for this.
I use parchment paper to avoid sticking but I’ve also added cornmeal to the bottom of the pot with mixed results.
I have been trying a couple of sourdough starter and bread attempts before and ended up with heavy rocks or dead starters. You explain things really well so I understand the why and how. THANK YOU!
These are the best sourdough recipe / instructions I’ve come across so far, and I’ve tried a few! Easy enough to make, though the dough is super soft and hard to handle, but absolutely worth it!
Thank you for the awesome recipe!
My loaves never seem to split the same way yours do–they don’t have same crusty look. Also, I do not have a dutch oven large enough to fit my loaves. Do you have any tips for baking on a cast iron skillet?
Any help is much appreciated.
Thank you 🙂
Hi Sydney,
My loaves starting splitting well when I made my lame (the stick with the razor blade). The razor blade made a huge difference. And when I use it, I go deep. It took my bread to the next level. I haven’t baked on a cast iron skillet but I have baked on a pizza stone which I think would render pretty similar results. I would put the skillet in the oven to heat up and then pull it out and drop the loaf onto it. You won’t get that same caramelized crust as you would with a Dutch oven but you will get a delicious loaf. When I use my pizza stone, my bread rises like crazy.
Enjoy!
Anne Marie
…soak the grains????…I don’t understand, what do you mean ?,witch are the “grains” ???sorry !!! Love your bread !!!
Hi Marisa,
That means soak the flours. I’ll go make a note on there.
Enjoy!
~ Anne Marie
Thank you ! I was filling silly asking …I’m old (78) and Italian… you are so graciosos, thank you !!! I always put the leaven
in the water and then add the flours… love making bread; yours look amazing !!! Ciao !
Thank you for the recipe! I will try it out, but I’m not sure about step #16. I’d start #4 in the morning at 10:00, so by the time I get to #16 I figure the time should be around 4:00 PM. If I start an overnight cold proof at that point, the dough would be in the refrigerator until about 7:00 the next morning, or roughly fifteen hours. Is that okay? I had heard not to exceed twelve hours when proofing in the refrigerator.
Hi Anne Marie, I’ve baked these loaves quite a few times, but I always end up with a very sticky loaf. I bake far longer than the recipe, and get an excellent crust and taste, but the loaf is too sticky. I don’t have a cast iron pot, but instead use a glass casserole dish with a lid instead. Any insight into the problem? The actual structure of the crumb looks fantastic, lots of air pockets, but it’s always sticky. I should also note that my loaf doesn’t double in size while proofing.
Hi Marcella, I wonder if you’re letting the bulk fermentation go too long. I would try cutting that shorter next time. And if you aren’t already, take lots of notes. That can help you pinpoint where problems arise.
~ Anne Marie
Thanks for the answer, Anne Marie. How exactly do I stop the bulk fermentation? Could I also ask if doing more than four turns or more frequent turns would speed up the fermentation process? Thanks for answering all these questions!
You’re welcome, Marcella. Sure you can do more than four turns. I don’t think it speeds up the fermentation process. To stop the fermentation, you just move on to the next step–dump out the dough and divide it into two blogs.
Hello! I’ve been following along and am about to use my healthy starter to try my hand at my first batch of sourdough! When the time comes to soak the grains the night before, do you mix the water and flours thoroughly for this step or just throw them together and let the sit for the night? Thank you!
Hi Karrah,
Woohoo! Mix the flour and water together. You’ll likely have to use your hand to get it incorporated well. Just use one hand so you don’t have to clean off both. It’s quite sticky. Enjoy!
~ Anne Marie
I know this sounds crazy, but how can I make a softer crust? I made the bread and loved it. It turned out great. But I really struggle to eat the crust with my dental problems. Can I make this bread in regular loaf pans so I can make uniform slices for sandwiches?
Hi Z-W C. I am gluten free and have been making this bread for about 2 years now with no reaction. I love the test and texture. Thanks so much for simplifying the directions from Pollan”s recipe! Question: I’ve always wondered how to tell if the bulk fermentation has gone on too long. Does the consistency of the dough change? I always stop at 4 or 4 1/2 hours because I’m afraid I’ll go too long without knowing it. Thanks!
Hi Anne Marie, thank you for such clear instructions. Even though your recipe is one of the clearest I have come across, I still have a couple of questions.
Firstly, why do you soak the grains? My dough seems too wet throughout. It gets a bit more springy, but it is still difficult to make a tight ball in the final stages. The bread looks good and tastes absolutely acceptable but it doesn’t rise much and it is a bit too stodgy inside. Any ideas how to overcome these would be greatly appreciated. Many thanks, Luiza
Hi! I really like your recipes! Two days ago I made this bread and it was amazing! Thank you for this recipe and clear instructions!
Inspiring Blog!
Today I made my first bread in a pot 😉
Works great 👍 Thank you very much for the recipe.
[…] projects keeps me buoyed. I’m learning to make sourdough bread. I’m inspired by Zero-Waste Chef. The whole process looks very slow and complicated. It’s enough to discourage me but it […]
Hi! I’ve made this sourdough bread a few times. The first time, I had my parents over for dinner & they loved it. My dad even said it was the best he’s ever tasted and he’s been making is his own bread for at least 40 years. I’ve made a few modifications to make it easier for me. I make about half the amount of leaven because I don’t’ need that much left over at the end (though sometimes I like to have extra around for pancakes). I’ve also made this successfully without spending 4-5 hours turning it every 30 minutes. I made this once when I forgot that I had other obligations during the bulk ferment and just hoped for the best. And it turned out great by just letting it rise for 4-5 hours without touching it. It’s a great time saver.
Is it possible to cut this recipe in half, in order to make just one loaf? Thanks!
Hi Lindsay,
Absolutely! You can also make just the amount of leaven you need for the one loaf and keep a small starter going in the background. That’s what I do now. It keeps my discarded starter pile more manageable.
~ Anne Marie
love the detailed instructions of your recipe! thank you so much for taking the time. My loaves came out great, I did one with roasted garlic and it is so tasty! I did not use any rye flour because it is pretty hard to find where I am living. How can I make the bread taste more sour? Is that why the Rye is included?
Hello, I’m self-quarantined and hoping to bake bread for the first time! Thanks for the recipe. Can I use all-purpose flour instead of white flour? Or are they the same thing? Thanks so much for any input you have.
Hi Alison,
Yes all-purpose or white. They are the same thing. I’d use unbleached white if you can find it but don’t worry if you can’t.
~ Anne Marie
Hello Alison,
Another self isolating question! I have followed all your instructions to the letter- except I have halved the ingredients as its just me. Made the leaven, soaked the grains. Combined the latter with water, and its not at all wet. Slightly sticky but not wet. It is a ball shape in the bowl, its like a dough already. My rye flour is quite grainy as I ground myself, but not lumpy. It is floury but a bit gritty. Its bed time now, am tempted to add a tiny bit more water and hope that will be ok! Any ideas?
Thanks
Henrietta
Hello,
What do you recommend doing if you don’t have a dutch oven? The instructions say you can use loaf pans or cookie sheets. Is there anything you have to do differently?
Hi Melanie,
I have been using a loaf pan for one loaf (my daughter prefers loaf-shaped bread) and my Dutch oven for the other loaf. Just put the loaf in the pan, let it proof and put it in the oven. I’d check on the bread after about 35 minutes to see if it’s done. For a cookie sheet, you’d use a towel-lined bowl or banneton basket and, turn the dough out onto the cookie sheet and put the cookie sheet in the oven. Again, I’d check after about 35 minutes on how it’s coming along.
~ Anne Marie
So you still do all of the turning and shaping of the loaf, even if you are making it in a loaf tin? Just got a starter from a friend so will feed it for the next few days then attempt to bake a loaf! Who knew being in lockdown could be fun!
Hi Taylor,
Yes, you still shape the loaf but then put it directly into the loaf pan, let it proof and then bake it. Today, on lockdown, I made a loaf on a cookie sheet. That also works well.
Happy baking!
Anne Marie
Thank so much, Anne Marie! For step #22, is that without the lid?
Hi Tonya,
Yes, without the lid! I’ll go edit that.
Thanks for asking,
Anne Marie
Hello, thank you for your excellent recipes and website. I don’t have spelt or rye on hand…how would you substitute the flour ratios using all purpose unbleached white and red fife wheat (what I have on hand). Thank you!
Hi Laila,
I would use about 80 percent of the red fife and white for the rest of it. It should turn out well. I’d like to try the red fife wheat!
Enjoy!
Anne Marie
Thank you for your recipe and detailed instructions! My dough is currently proofing overnight in the fridge. I’m a bit concerned because it is much more runny than yours. I’m not sure why since I used the flour and water amounts. Hopefully it turns out ok when I bake it tomorrow!
Also, as a bread novice, I found step 14 rather difficult to follow without some sort of visual aid. Have you thought of adding pictures or making a short video showing these folds? Thank you again!
just reading these comments hoping to pick up any tips as I myself have never made sourdough bread. i know many of the words/terms but a thought just popped into my head – what if there was a sourdough ‘dictionary’? ex. grains = flour etc. . .
thank you for all the helpful, life-changing info you provide! looking forward to your book also.
Hi Anne Marie! I am wondering if the temperature for the baking can be lower then 450-500 F? My Dutch oven (as per label) could be heated only by 400F. Any suggestions? Thank you so much!
Hi Sasha,
I haven’t tried baking it at 400F but I would try that. You might want to make half the recipe and see how it goes.
~ Anne Marie
[…] been using a set of directions derived from Michael Pollan, who derived his method from Chad Robertson of Tartine Bakery in San […]
Hi Anne Marie. Long time follower, first time sourdough maker. Just a question about what you mean about freshly fed starter. Do you mean right after it has been fed, or waiting for it to rise and fall again before using it to start?
I was wondering about the same. An answer would be very helpful!
Hi Charlotte,
Active, as in fed a few hours before you’ll use it. I’ll go edit that to make it clearer.
~ Anne Marie
Hi Keziah, I mean an active starter that you’ve fed and that has risen up. I’ll go edit that.
Thanks,
Anne Marie
Thank you for your response! I really appreciate that you take the time for this.
If I have a robust amount of starter already, can I cut the quantities for the leaven in half and add the entire leaven to the dough the next day? You started to address this earlier, but I wanted to make sure as I am new to the sourdough world!
Ok, so I’m a complete mess apparently and spaced out when adding the levain this morning, and instead of only adding half, I added ALL of it. Is there anything I can do?
Hi Taylor,
Someone just yesterday asked me this very same question. I think your bread will be fine. I’d add a bit more flour (if you see this comment in time!) because the dough will be more wet. It will also likely ferment faster, so I’d stop the fermentation early. These days, I make only the amount of levain I need and I use the whole thing and in the background, feed my small starter daily to keep it alive.
~ Anne Marie
In step 4, you said the remaining levain becomes the new sourdough starter.. so do we combine that with the original sourdough starter? Or do we now have two sourdough starters? Thank you!
Hi Anne Marie,
When you proof in baskets, what do you use to cover them in the fridge?
Thank you,
Rebecca
Hi Rebecca,
I cover the baskets with a thin tea towel.
Enjoy your bread!
~ Anne Marie
Hello again! I am sad because my leaven did not double in volume and it is throwing off my sourdough schedule as I do have to work tomorrow and cannot babysit it. I have already soaked my grains per this recipe and don’t want them to go bad while I figure out my leaven situation. Do you have ideas on how to preserve the soaked grains until I am able to use them? *sigh*
Hi Anne Marie,
I’ve tried other recipes & methods and though I’ve gotten some good tasting bread, it’s not as “airy” as yours (or theirs) looks. With less water to flour ratios I’ve still have dough that was way too sticky and wouldn’t hold up to shaping, i.e would have been better for pizza. In reading your instructions I see that you have an even higher ratio of water – I’m quite confused. Even more, I’m confused about one thing in particular: most recipes call for “bulk fermentation” after folding. Are you saying that the folding “is” the bulk fermentation? Thank you, Michael
Hi Michael,
That’s right, I do the stretch and folds during the bulk fermentation. Some recipes knead the dough a bit and then let it sit for a bulk fermentation. There are lots of different ways to do it. The first time I made this, I added even more water and found it hard to work with, so I cut back to about 700 grams and slowly worked my way up. (The type of flour also makes a wetter dough. I find a lot of spelt results in very wet dough.) Today, I usually add around 800 grams total (that includes the 50 grams I add later with the salt). Wet does get a nicer crumb, I find. I hope that helps.
~ Anne Marie
Hi Anne Marie,
Thank you for your reply – but I’m still confused. If wetter dough makes a more airy crumb then why did my wet dough not rise? So you can help me make sense of this, here’s what I did. Mixed the salt and levain with dough that had autolysed for over an hour. Turn and folded every 30 minutes for six folds (super sticky). Then left the dough to bulk ferment for several hours. Then turned it out and tried to work with it – eventually getting the blob into some bannatons to rise over night. I ended up with 2″ of total rise, tasty but wet and dense. When I used less water I actually got it to rise a bit more, but not more than about 3″. Thanks so much, I’m sure you have better things to do. Best, Michael
Hi – I have been trying to get a starter going for about one month with no success. I ended up with starter that passed the float test but wasn’t rising very much, or consistently?! I just discarded all except for enough to use for yours. My question is – having started with my starter and 40 g water n rye flour, it is now riding nicely. Do I feed again tonight (12 hours) or wait until tom. am? I’m not sure if my problem was over feeding my other attempts. I was using AP flour only after starting with WW or Rye?
Also for your bread recipe can I sub Bread Flour or a combo for the WW?
Hope this makes sense.
Thx!
Hello. I was wondering, in step 4 you said the remaining levain becomes the new sourdough starter, so does that mean we should combine this with the original sourdough starter or do we now have two separate sourdough starters? Thank you!
Hi. I just made my levain last night, and I currently have the same concern. Have you figured this out? Thank you!
Hi Philippa,
No, just add that original starter to your discard pile. That isn’t as lively as the levain you just made. So you’ll a jar of discard in the refrigerator and your extra levain/new starter. I hope that makes sense. I’ll go add a note in the instructions.
Enjoy!
Anne-Marie
Help! My starter is more than 4 weeks weeks old, and is nice and thick with a good aroma, but is not getting bubbly throughout. It has a bunch of small bubbles on the top surface, but none visible through the sides of the clear mason jar. I had a starter 2 years ago that was clearly bubbly throughout. I’d hate to start over entirely. Any recommendations to get my sad starter to a healthy state? Appreciate any advice. Thank you!
Hello,
This is my first time baking sourdough bread. I’ve had my starter going for a couple of weeks and I’m ready to go. Maybe its because I’m a dude but I’m having a hard time visualizing how to do step 12 and 14. If there is any way you can try to rephrase these steps or reference a youtube video I would be grateful. Thanks for putting this all together
[…] After doing a brief literature review (I especially like the instructions from The Perfect Loaf and Zero-Waste Chef), and listening to this interview with Clémence Gossett of the Gourmandise School here in LA, I […]
I’m looking forward to finally trying this recipe! After reading your “How to Prevent Your Sourdough starter from taking over your life” blog, should step number 4 be updated to using the whole leaven? Thank you!
[…] Download Image More @ zerowastechef.com […]
Love the site. Thanks for all the info. Any thoughts on baking both loaves at once in two separate Dutch ovens? I tried this and the loaves seemed more dense but I am a new baker and may have made other mistakes so I’m not sure if that was the reason. If there is no good reason to bake them separately I would rather use less gas and heat up the house less by doing both at one time.
Hi GG,
I would do that if I had two Dutch ovens and they fit in my oven (my oven is tiny). I’ve also baked one in the Dutch oven and one in a loaf pan next to the Dutch oven (the loaf in the pan seems to bake faster). I don’t think using two ovens should affect the bread. If the loaves are dense, it could be that the dough fermented a bit too long. Maybe try stopping the bulk fermentation sooner next time. Also, if you didn’t do a cold proof, that makes a big difference in my bread. A lame for scoring the bread also does. I hope that helps!
~ Anne Marie
Thank you!
Hei Anne Marie, after my first loaves all turned out really great, and the baking was fun and easy, I am now stuck with a very, very wet dough (no spelt involved). I already cut down the water a bit, because this has been happening quite a few times now. It is so wet that I can hardly turn the dough or even shape it, it looks like a giant pancake on my counter. Amazingly, when I scrape the mess up and put it in a bowl to proof and bake later on, it still tastes really good. But the baking process is a pain. Any idea why this is happening? Maybe because it’s summer now and warmer? Or because my starter feels neglected as I only take it out of the fridge the day before baking, feeding it and then making the leaven? (Beforehand it was always on my counter and fed daily). Thanks for taking the time to answer. Love, Mila
The recipe has worked well for me, but recently the dough hasn’t bloomed at the score marks, which leads me to believe it is overproofed. My kitchen gets warm during the summer, sometimes as high as 85 degrees F. I shortened the autolyzing time and ended bulk fermentation at four hours before retarding overnight in the fridge. But that may not be enough. What kind of adjustments should be made to the recipe when the temperature goes up?
Hi. Thanks for giving me the push I need to make a sourdough -the first one is bulk fermenting now. Do you use strong bread flour or just ‘normal’ strength flour? I hope I can use either! Three ferment that’s on the go at the minute is using string flour.
Hi, Anne Marie!
I am totally new to the world of sourdough. My starter, Eloise, is finally ready for baking, and I am so excited!
I don’t have any whole wheat flour at the moment — only unbleached white and rye, which is the combo I have been using for my starter. My question is: Can I sub rye for whole wheat in the leaven recipe?
I am trying to make fewer trips to the grocery store these days, so I just thought I would check before I go out & buy whole wheat flour! Thank you! I love your recipes so much, and I cannot wait for your cookbook. 🙂
Best,
Una
Hi Una,
Congratulations and hello Eloise! I would go easy on the rye. It doesn’t contain much gluten and you’ll get a flat loaf. So if you don’t buy whole wheat, just use 80% white and 20% rye. Thank you for the kind words and happy baking 🙂
~ Anne-Marie
Oh my! The excitement is palpable in my kitchen this morning. Third time lucky!!! I have a beautiful seeded sourdough loaf. Mildly dense but still a bit airy and taste so moorish!! Thank you so much for all you recipes, blogs and answers to questions. It has helped my journey so much. I’m going into an Aussie summer (yesterday was 38c!). Any hints for hot weather fermenting and baking? Thanks again xx